
Key Points to Workflows
-
Create forms to assist with recording data on work orders and inspections.
-
Keep track of preventative maintenance and repairs on assets.
-
Generate reports using the data collected from the workflows.
Detailed Description on Workflows
Workflows can be viewed as an internal form that consists of a series of questions that a worker answers while completing an inspection or work order on an asset. Workflows can be customized to accommodate any type of work that is being completed. Some examples of what a user can create a workflow for include: hydrant inspections, pump station inspections, manhole inspections, cross connections, water quality complaints, fog inspections, water main breaks, building maintenance work order, etc.
Create a Workflow
Quick Steps to Create a Workflow
Workflows are created to assist workers with recording data from inspections or every day work orders. The data that is recorded results from a series of questions and answers that are customized in the workflow. This data can then be populated into a variety of reports.
-
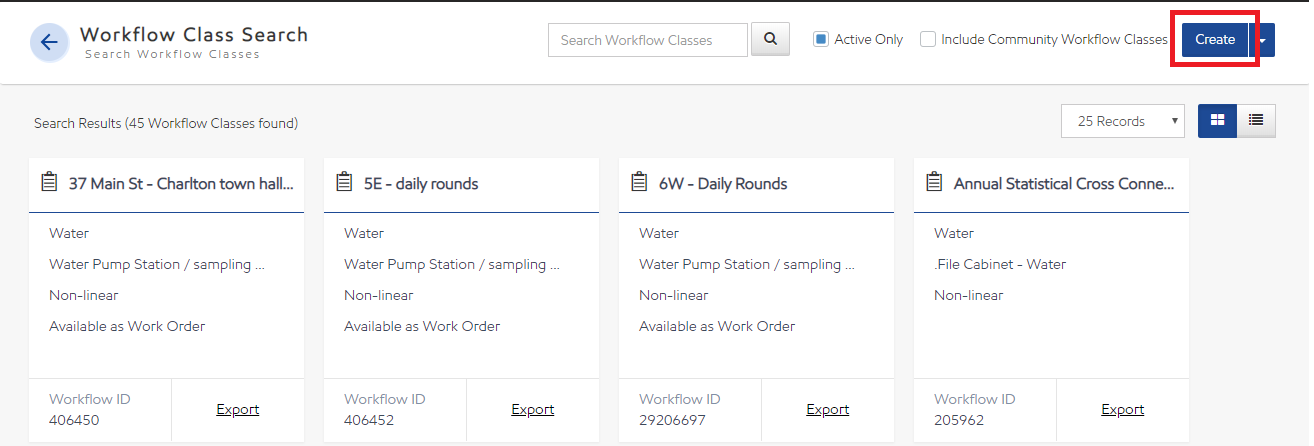
Select the Workflow tile from the Dashboard or select it from the left navigation bar.
-
Select the Create icon.
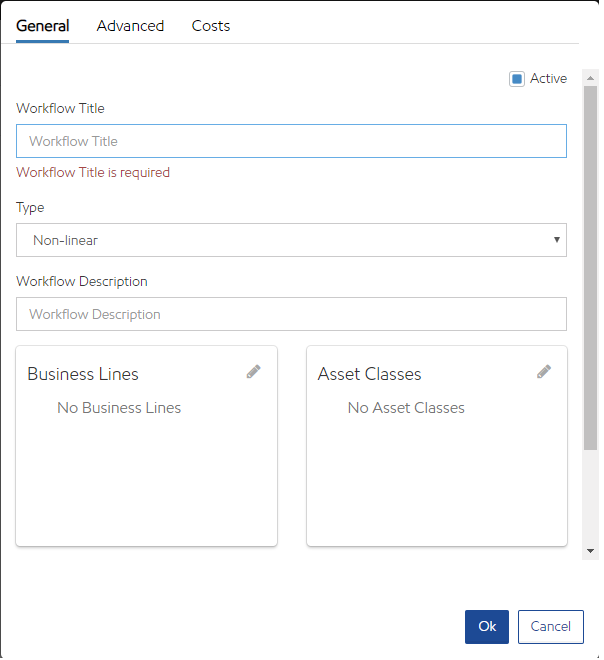
General Settings
-
Workflow Title: This title appears throughout the system. NOTE: Limited to 50 characters.
-
Workflow Type:
-
Non-linear: work to be done against any asset.
-
Linear: work to be done against linear assets using walk the line.
-
Sequence: work to be done against sequence assets as part of a sequence.
-
-
Workflow Description: A brief overview of this workflow
-
Business Lines: Determine under which Business Lines this workflow is available.
-
Asset Classes: Determine which asset classes where this workflow is available.
-
Stakeholders: Determine which Stakeholders are notified when additions and updates are made to each asset added to this class.
Advanced Settings
-
Preferences
-
Available for use in work orders: Allows for this workflow to be available when work orders are created.
-
Compare and confirm entries: Create a pop-up box of the details of the current workflow alongside the detailed results of the prior workflow for review prior to submitting.
-
Share workflow with Utility Cloud Community: Allows other Utility Cloud customers to copy this workflow for use in their own system. They can only see the workflow and configuration, not your specific information.
-
Enable Asynchronous Submission: Improves the submission of a workflow report by performing triggers and other behind the scenes logic after a workflow report is submitted instead of waiting for logic to complete. This means there will be a delay on your workflow report submitting, and f you need to see immediate updates on your submission or the results of your triggers, it is best to leave this setting disabled.
-
-
Geospatial Settings
-
Enable Proximity Verification: Require the worker completing the workflow to be within a specific distance from the asset in order to complete the workflow.
-
Proximity Verification (in feet): The distance the worker is required to be from the asset.
-
-
Auto Schedule
-
Automatically schedule this workflow whenever a new asset is created that is associated with this workflow. It creates a Work Schedule for this workflow and all assets of the same asset class for the account.
-
-
Completion Settings
-
Success Percent Complete: Allow users to view their success percentage rate when workflows are scheduled against work. Users are able to view this rate by viewing the Global Work section on the Dashboard.
-
Provide chain of custody id (sampling): Create a pop-up providing a reference number when completing work.
-
Notify Stakeholders: Check to send an email to the associated stakeholders when this workflow is complete.
-
-
Data Retention Policy
-
Enable Retention Policy: If enabled, all workflow reports for this workflow class will be automatically deleted from Utility Cloud if they were created before the Retention Policy. If not enabled, workflow reports will never be automatically deleted for this workflow.
-
Retention Policy (Years): The number of years back from the current date workflow reports should be retained.
-
Costs Settings
-
Enable Resource Tracking: Allows equipment, labor, and material fields to be returned for reporting on any workflow reports of the workflow when retrieved for Google reporting or through the Excel add-in.
-
Total Equipment Cost (Dollars): The default total cost of equipment used when completing work for the workflow.
-
Total Labor Cost (Dollars): The default total cost of labor when completing work for the workflow.
-
Labor Hours: The default labor hours expected to be performed when completing work for the workflow.
-
Total Material Cost (Dollars): The default total cost of material used when completing work for the workflow.
Creating Custom Workflow Fields: See Asset Class Attributes and Workflow Fields for more information on adding custom attributes.
Security Rights Required: Can Create Workflow, Can Edit Workflow, Can View Workflow, Can Copy Workflow
Once the Details tab is filled out and all the workflow questions are added to the Form Fields section, select the Save button at the bottom of the page to save the workflow.
Create A Workflow Video
Create and Edit a Workflow
Search for a Workflow
You can search workflows by typing a value into the search bar. The search engine searches for workflow titles, descriptions, business lines and asset classes to produce results.

To view the results in card view, select the card icon:
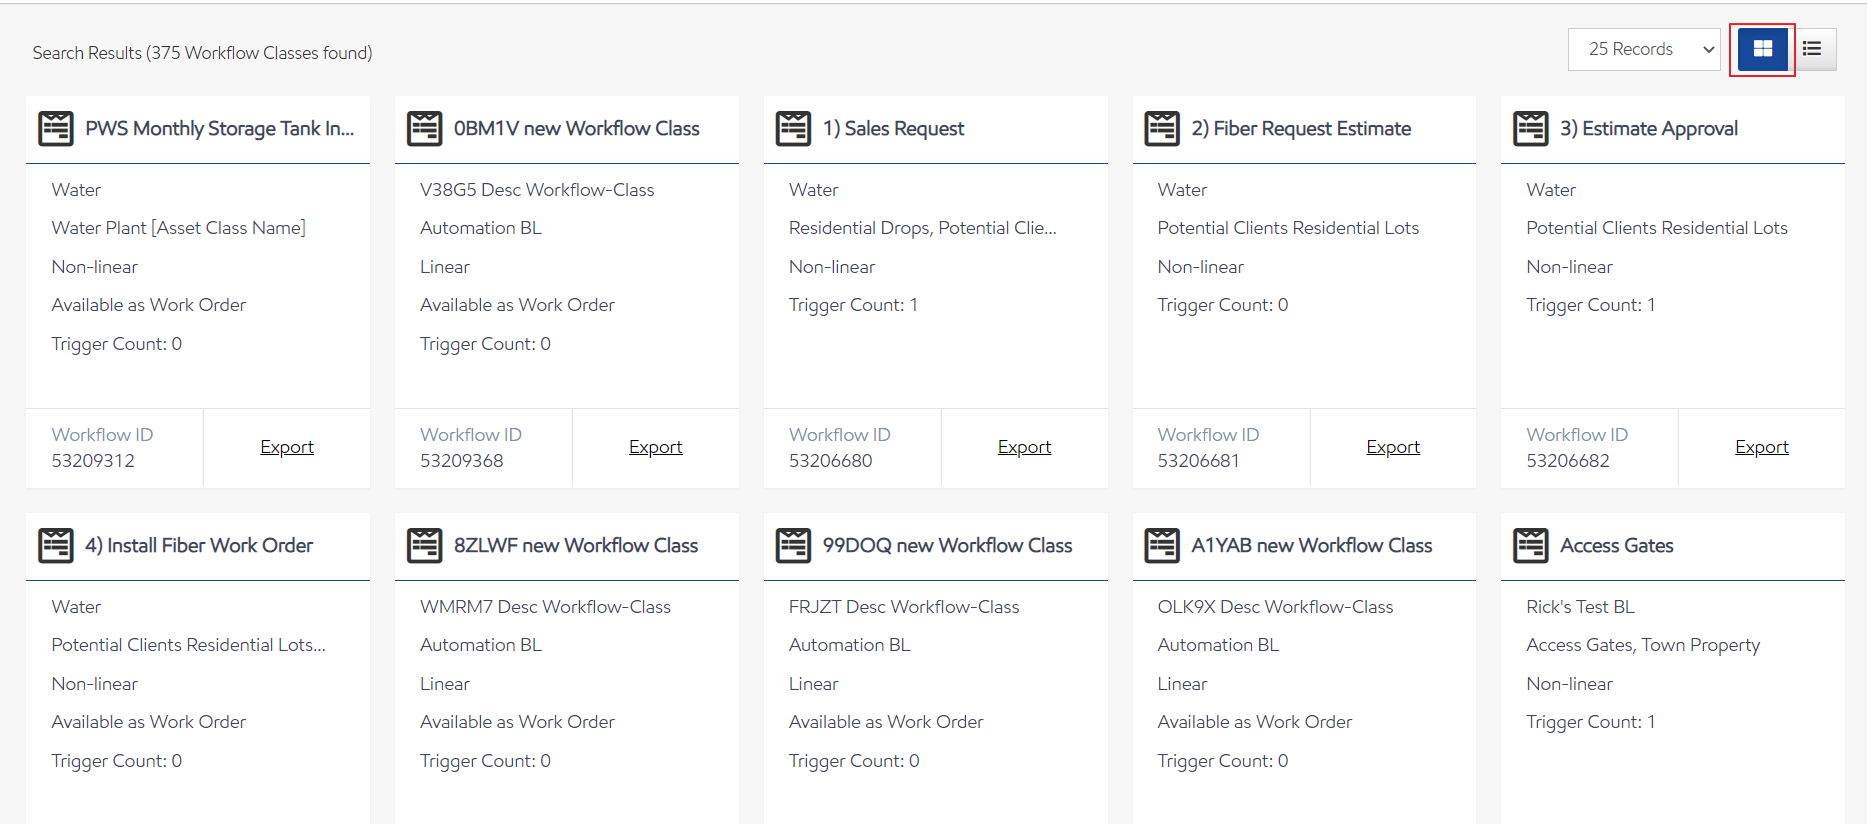
In card view, the workflow card shows:
-
Workflow Title - title of the workflow.
-
Business Line(s) - all business lines associated with the workflow/
-
Workflow Description - the description of the workflow
-
Workflow Type - whether a workflow is non-linear, linear, or sequence type.
-
Available as Work Order - whether a workflow is available as a work order. This does not show if it is not.
-
Trigger Count - the number of triggers on the workflow.
-
Workflow ID - the ID of the workflow.
To view the results in list view, select the list icon:
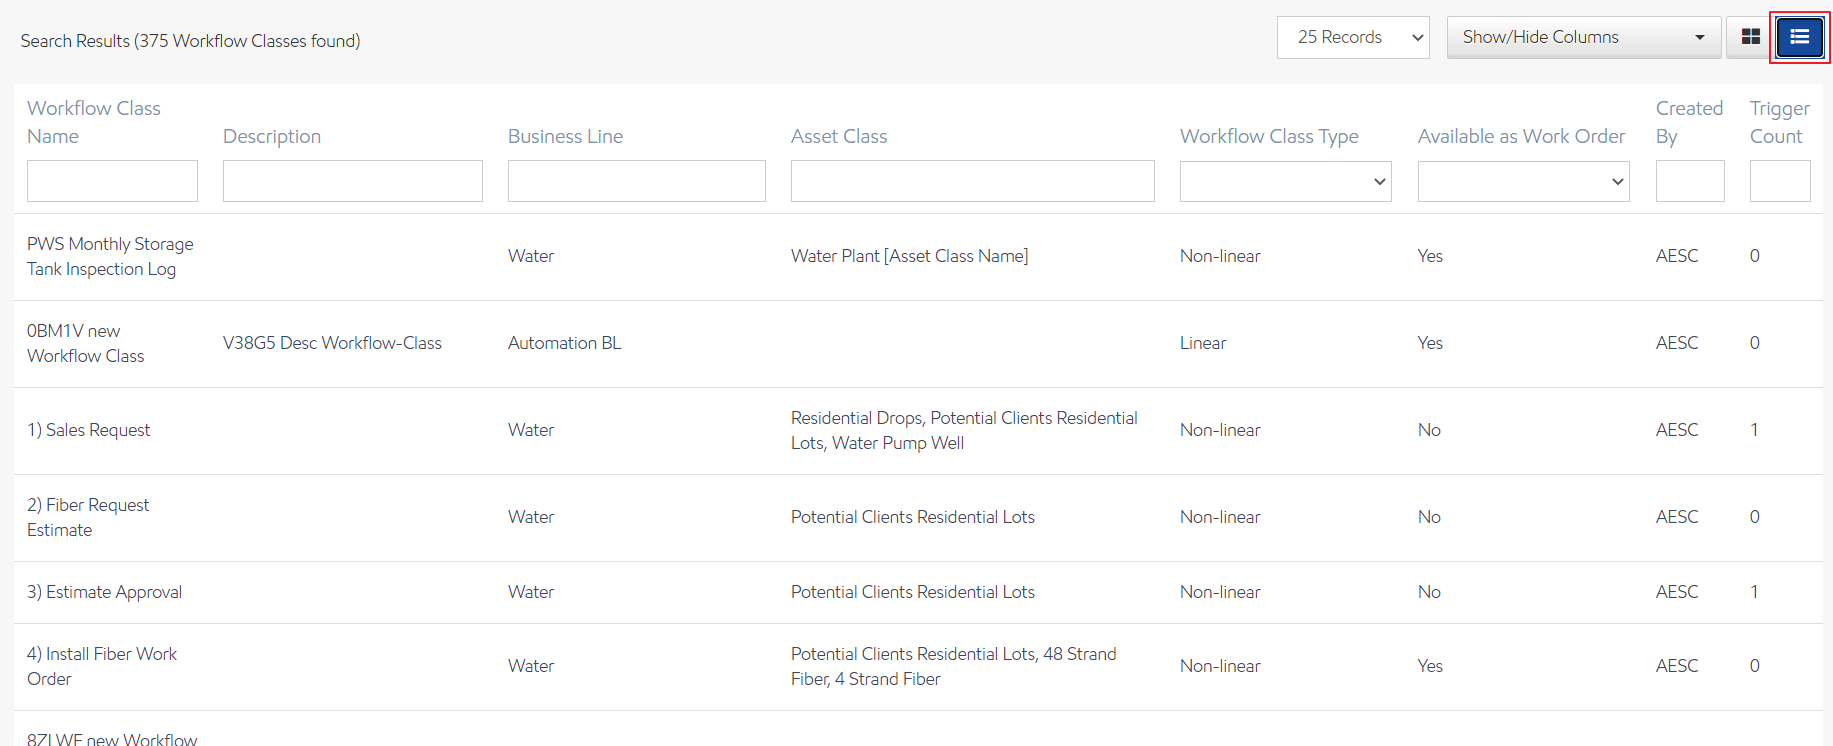
List view shows all the same fields as card view as table headers, and users are additionally able to filter and sort by those fields.
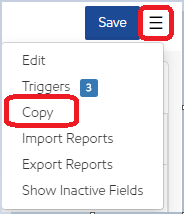
Copy a Workflow
-
Select Workflow Classes from the Dashboard or select it from the left navigation bar.
-
Search for the workflow class to be copied and open it.
-
Select the menu icon next to the Save button and select Copy.
-
Edit the General Settings, Advanced Settings and Costs as necessary.
-
Review and Edit the fields (questions) on the Form Fields tab.
-
Select Save.
Security Rights Required: Can Create Workflow, Can Edit Workflow, Can View Workflow, Can Copy Workflow
Workflow Triggers
Workflow Triggers allow you to streamline operations by automatically performing actions based on values in a workflow.
Depending upon one or more Conditions, one or more Actions can be performed.
Select the Conditions under which the Actions are performed.
Conditions
Select Always if the action occurs whenever the workflow is edited.
Note: If Always is selected, no other conditions can be selected within the same trigger condition block. It needs to be a single condition with its own actions and not combined with other conditions.
Select an attribute, select the comparison:
-
Equal
-
Not Equal
-
Begins With
-
Doesn't Begin With
-
Contains
-
Doesn't Contain
-
Ends with
-
Is Empty
-
Is Not Empty
Note: Not all comparators are available for all field types.
Then select the Compare type for the attribute.
-
Reported Value: the action occurs based on the value of a single attribute
-
Compared Value: the action occurs based on a comparison between the selected attribute and another attribute on the workflow
-
Expression: the action occurs based on a comparison between the attribute and an expression.
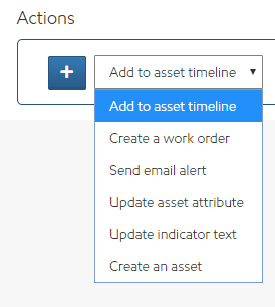
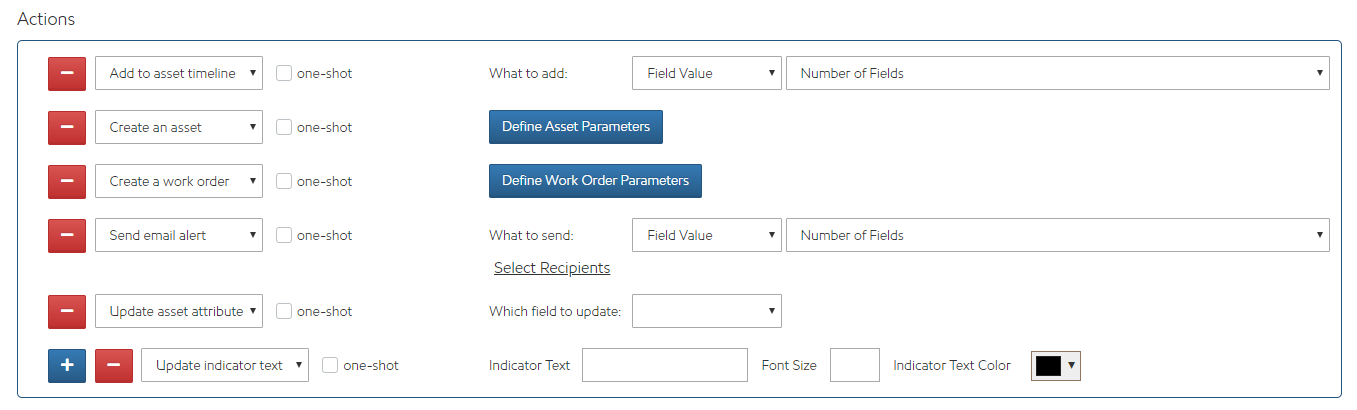
Actions
-
Add to asset timeline: when the conditions are met, a note is added to the asset timeline containing a single field value or a custom message.
-
Create an asset: when the conditions are met, an asset is created in the current account or a different account of the same Business Line.
-
Create a Work Order: when the conditions are met, a work order is triggered on the current asset or another asset
-
Send email alert: when the conditions are met, an email is sent to the selected recipients containing a field value, the full workflow, or a custom message
-
Update asset attribute: when the conditions are met, the specified field on the asset is updated to the value of the specified field from the workflow class
-
Update indicator text: when the conditions are met, indicator text on the asset is updated to the desired text, color, and font size on the map
-
One-shot: for all actions, define the behavior of the trigger according to the following table.
|
|
One-shot=true |
One-shot=false |
|---|---|---|
|
Condition=always |
The trigger fires only the first time the edited/created workflow is saved. |
The trigger fires every time the edited/created workflow is saved. |
|
Condition=true expression |
The trigger fires the first time the edited/created workflow is saved.
(And again one time for subsequent true->false->true transitions) |
The trigger fires every time the edited/created workflow is saved. |
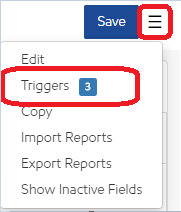
Steps to create Workflow Triggers
-
Select the Workflow Classes tile from the Dashboard or from the left navigation bar.
-
Select the desired search criteria to find the specific Workflow.
-
Select the Workflow to access the Workflow Editor screen.
-
Select the menu icon and select Triggers.
-
The Triggers page appears.
-
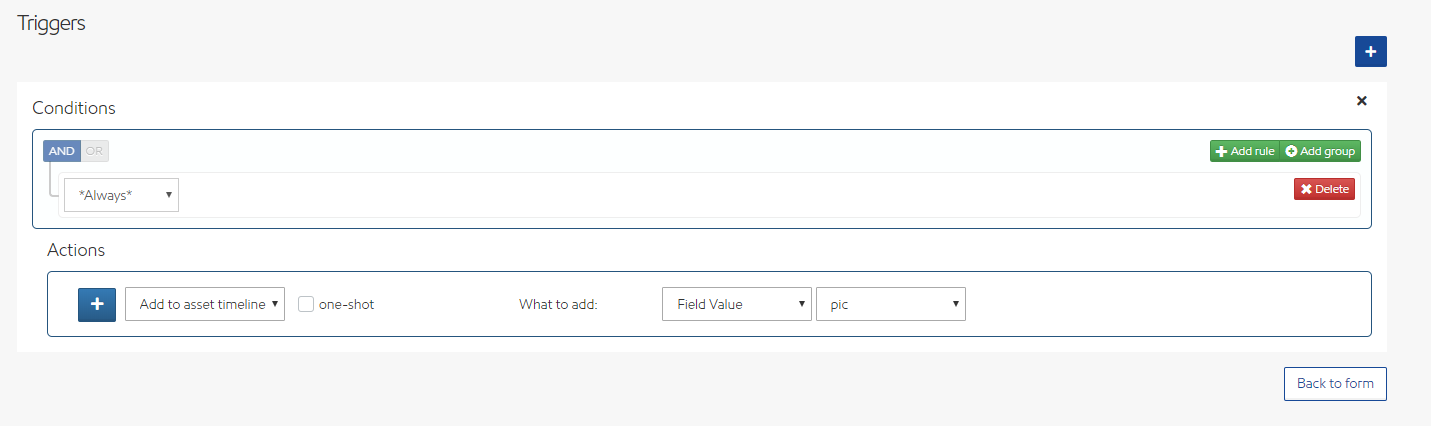
Select the Condition(s) that trigger an Action. Select Add Rule or Add Group to further refine the trigger conditions.
-
Select the

-
Select the Action(s) to take when the condition is met.
-
After choosing an action, complete the information as follows:
-
-
Check one-shot, if the trigger should only run the first time the condition is met.
-
Add to asset timeline
-
Select What to add:
-
Field value: select the field
-
Custom message: enter message
-
-
-
Create an asset
-
Select Define Asset Parameters. The Create Asset Trigger dialog box appears.
-
Fill in Trigger, Field Mapping, and Location settings.
Note: For more details on completing the Create Asset Trigger dialog box, see Create Asset Trigger Details. -
Select Save to create the asset trigger or Cancel to exit without creating the trigger.
-
-
Create a work order
-
Select Define Work Order Parameters. The Create Work Order Trigger dialog box appears.
-
Choose Current Asset or Other Asset and complete work order information.
-
Select Save to create the work order trigger or Cancel to exit without creating the trigger.
-
-
Send email alert
-
Select What to send:
-
Field Value: select the field
-
Full Workflow
-
Custom Message: enter message
-
-
Select Select Recipients and enter email addresses or select from list.
-
-
Update asset attribute
-
Select Which field to update:
-
Select the field
-
-
-
Update indicator text
-
Enter Indicator Text
-
Select Font Size
-
Select Indicator Text Color
-
-
-
Select Save to save the trigger definition.
Security Rights Required: Create Workflow, Edit Workflow, View Workflow
Export a Workflow Class
To Export an Workflow Class, search for the Workflow Class and select the Export link on the tile.
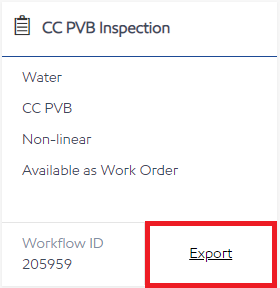
A Microsoft Excel sheet is created with all data regarding the Workflow Class including general information about the workflow as well as all the fields.
Import a New Workflow Class
-
To Import a new Workflow Class, first download a template by selecting the down arrow next to the Create button and select 'Download a Template'. A Microsoft Excel sheet is created with all data regarding the Workflow Class including general information about the workflow as well as all the fields.
-
Fill out the spreadsheet with the desired information and save it locally.
-
From the Workflow Class search screen, select the down arrow next to the Create button and select "Import'.
-
Browse to the file that contains the Workflow Class information and select Upload.
Update a Workflow Class
-
Locate the Workflow Class to be updated and select the Export link on the tile. A Microsoft Excel sheet is created with all data regarding the Workflow Class including general information about the workflow as well as all the fields. Update the desired information and save it locally.
-
From the Workflow Class search screen, select the down arrow next to the Create button and select "Import'.
-
Browse to the file that contains the Workflow Class information and select Upload.
Connecting the Workflow to Google
Reports can be configured to generate based off of a completed workflow. For example: the results of an inspection can trigger an Inspection Report to be generated. A workflow can be connected to several reports. Prior to being able to see reports returned to Google additional setup will be needed. Please see Accessing and Uploading to Google.
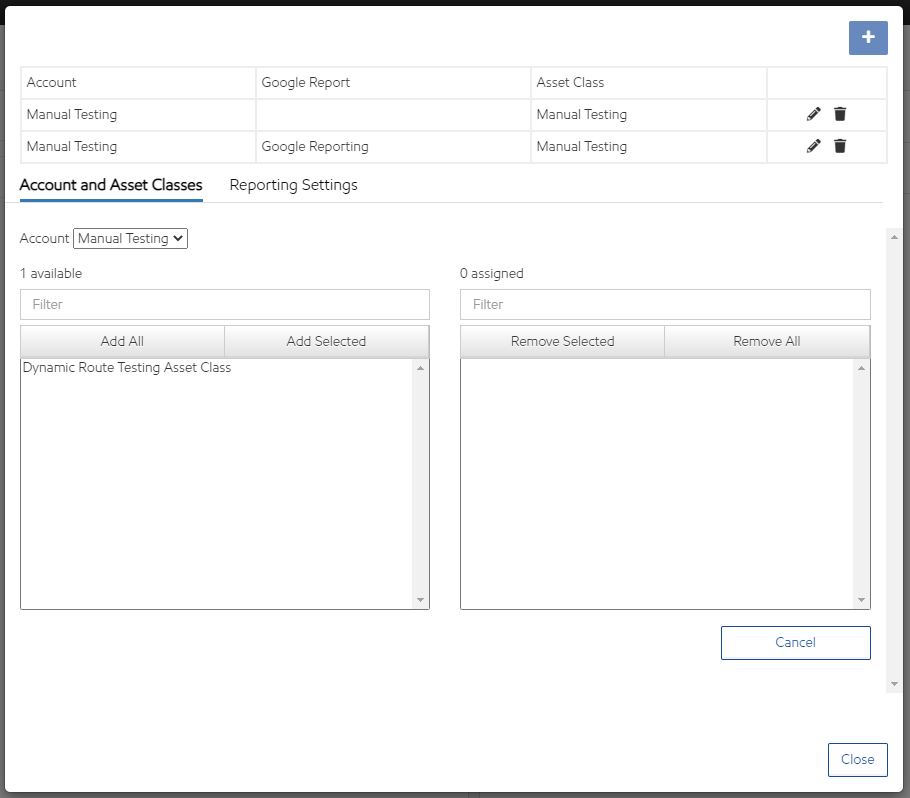
Quick Steps to Creating a Report Setting
-
From any workflow, select Reporting in the top-right dropdown.
-
Select the + add icon in the top-right.
-
Select an Account and Asset Class, then select Reporting Settings.
-
Select Spreadsheet/Worksheet and Source Spreadsheet/Source Worksheet, then select Save.
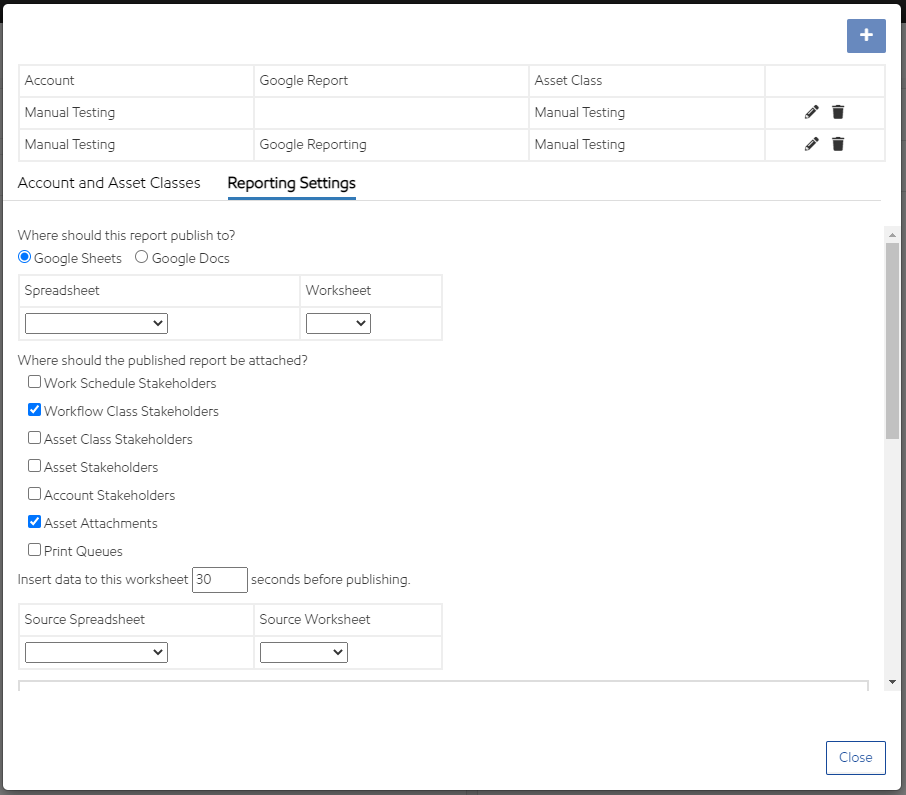
Detailed Steps to Creating a Report Setting
In Reporting Settings, users are able to specify various settings about how and where Google reports are published:
-
Identify where the report should be published:
-
Select Google Sheets to create the entire report in Google Sheets.
-
Select Google Docs to create a report in Google Docs. Selecting Google Docs will still require a Google Sheet to be created to capture the data. The Google Doc will then need to be configured to read the data from the Google Sheet.
-
-
Select the Spreadsheet/Document. The dropdown will display all files that exist in the linked Google account. See Accounts for more information about linking to a Google account.
-
Select the Source Worksheet (if Sheets was selected above). The list will display all the tabs within the selected Spreadsheet. Select the tab that contains the formatted report to be returned. Typically, it is recommended to create an empty tab in a Google Sheet and label it "Report". Format this tab as desired to create a report.
-
Select where the resource is published:
-
Work Schedule Stakeholders
-
Workflow Class Stakeholders (default)
-
Asset Class Stakeholders
-
Asset Stakeholders
-
Account Stakeholders
-
Asset Attachments (default)
-
Print Queues
-
-
"Insert data to this worksheet X seconds before publishing.": This is the length of time Utility Cloud should wait to send the report back to the selected resources. Sending large amounts of data to Google can occasionally take longer and may return a blank report. If a report is returned without any data in it, increase this time accordingly. Typically 30 seconds is long enough to generate the average report. Increase this time in increments of 30 seconds (i.e. 60, 90, 120) until the report returns the expected data.
-
Select the Source Spreadsheet and the Source Worksheet to publish data. Select a spreadsheet and worksheet that will capture the completed workflow and asset attribute data when the work has been completed. It is recommended to create an empty worksheet in a Google Sheet and label it "Data".
-
"Don't copy the source spreadsheet during the publish process":
-
When unchecked, when Utility Cloud generates the Google report, it makes a copy of the original file, sends the data to the newly created copy of the report, processes the data in the copy, and sends the result back to Utility Cloud. This process supports the ability to have multiple workers complete work and generate reports without conflicting with each other.
-
When checked, Utility Cloud will not create a copy and instead post the data directly to the original file. This is necessary when the report is being created for the first time to send the data so that it can be linked to the report. Once the data has been sent to the Google Sheet for the first time, this box can be unchecked again to avoid conflicts. NOTE: If any changes need to be made to the report in the future (i.e. fields have been added to the workflow or asset that need to appear in the report), this box needs to be checked again in order for the new fields to be sent to the original report. Once the edits have been made to the Google Sheet, this box can be unchecked again to avoid conflicts.
-
-
Identify the Page Options.
-
Select Save.
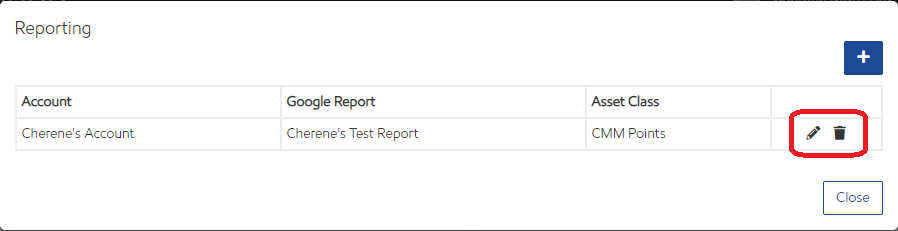
Edit or Delete a Report Settings
Once a report setting is created, select the pencil icon to edit the settings or the trashcan icon to permanently delete.
Import/Export Workflow History
From the Workflow History Search screen, locate the workflow to import history. A workflow must exist prior to importing work history.
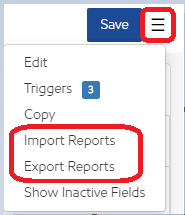
From the menu, select Export Reports. This will create a Microsoft Excel spreadsheet template for the work history.
Update indicator text
Add the work history to the spreadsheet in the appropriate fields leaving the Workflow Report ID column empty.
NOTES:
1) The spreadsheet must be saved as .csv (comma delimited).
2) If triggers exist on the workflow, these will not be triggered when importing work history.
From within the Workflow Editor, select Import Reports.
Related articles
Filter by label
There are no items with the selected labels at this time.