
Key Points to Asset Classes
-
Create categories to store related assets in.
-
Easily access asset and attribute information using Asset Classes.
-
Asset Class attribute data is instantly available for reporting purposes.
-
Asset Classes must be created before creating Assets.
Detailed Description of Asset Classes
An Asset Class must be created before creating Assets. Asset Classes can be found under each Account in the Utility Cloud. Asset Classes are created to store a category of assets. Users would create Asset Classes for some of the following assets; hydrants, wells, manholes, streets, sewer lines, water mains, FOG assets, buildings, address points, etc.
Create an Asset Class
Quick Steps to Create an Asset Class
-
Select the Asset Class Tile from the Dashboard or select it from the left navigation bar.
-
Select Create.
-
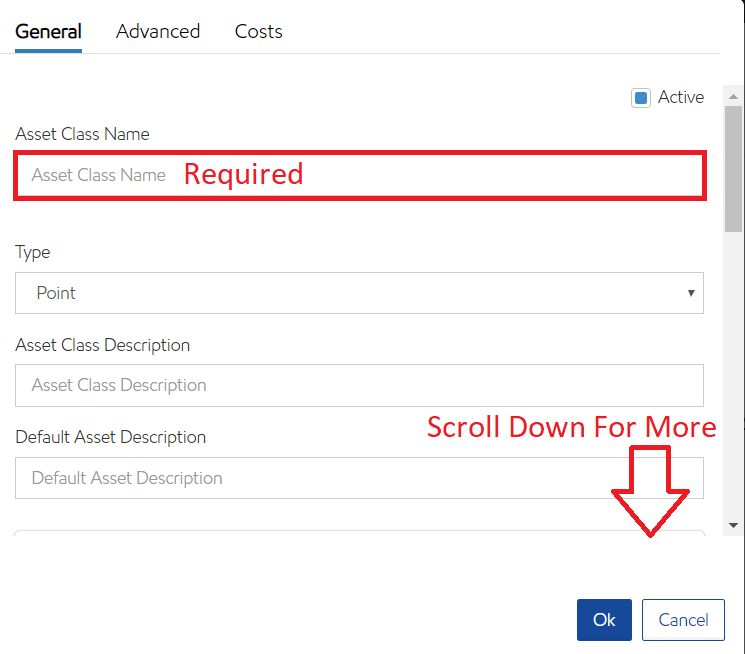
Enter the Class Name and Type.
-
Scroll Down.
-
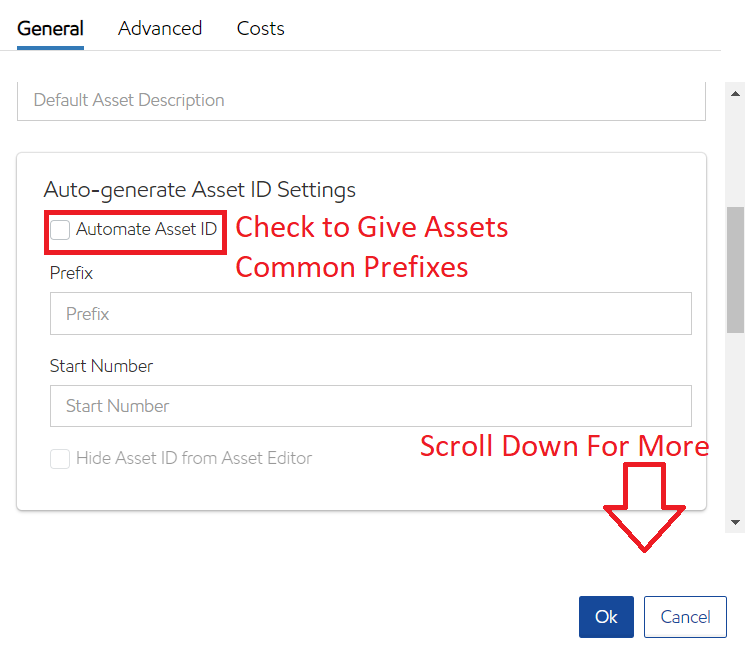
Enter Description and Asset ID.
-
Scroll Down.
-
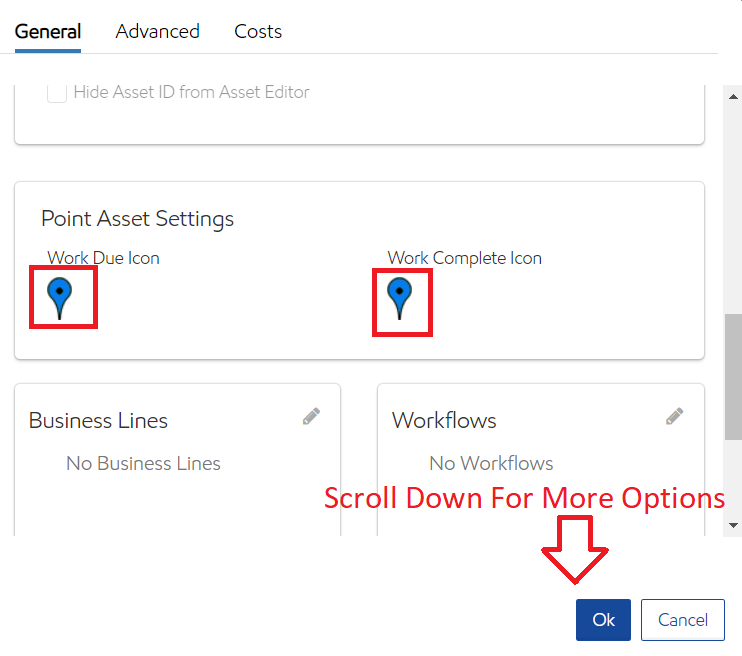
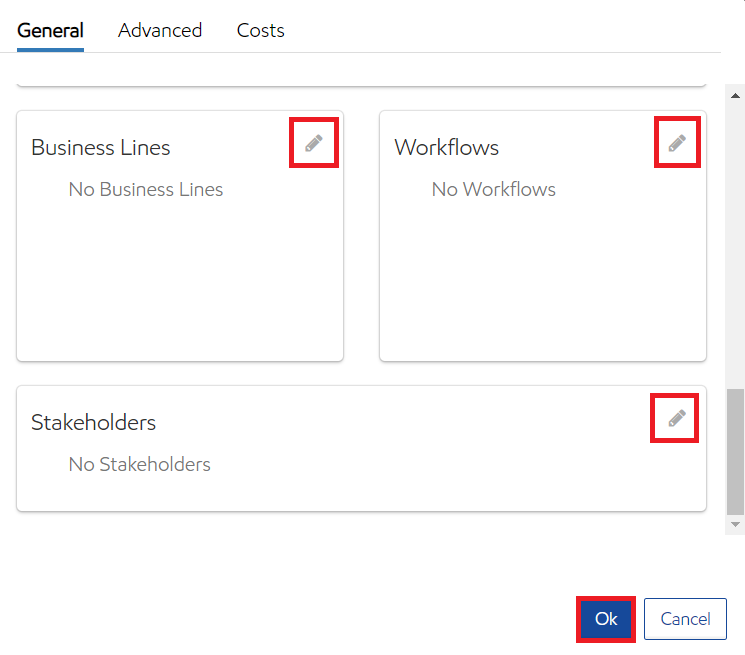
Select associated Business Lines, Workflows, and Stakeholders using the pencil in the upper right corners.
-
Select Save.
Security Rights Required: Create Asset Classes; if the user has this right they will see the Create box in the Asset Class Tile

Detailed Steps to Create an Asset Class
General
-
Name- Enter the Name of the Asset Class.
-
Asset Type- May NOT be changed once the class is created.
-
Point- Assets created in this type of Asset Class represent a single point in space.
-
Line- Assets created in this type of Asset Class represent a line between points in space.
-
Polygon- Assets created in this type of Asset Class represent an area between points in space.
-
-
Asset Class Description - A brief description of the Asset Class.
-
Default Asset Description- Enter a default description for all assets added to this class.
-
Auto-generate Asset ID Settings
-
Automate Asset ID- Select this box if Utility Cloud should automatically assign sequential asset ids.
-
Prefix- When information is entered here all asset id's in this class will have a prefix. (for example: each hydrant asset id may start with "HYD-")
-
Start Number- The number that Utility Cloud should begin with when automatically generating asset ID (for example: HYD-1, HYD-2, etc)
-
Hide Asset ID from Asset Editor - Since the asset ID is an automated number, it may not be necessary to display it. Check this box to not display it.
-
-
Point Asset Settings - Select the icons to change the appearance of the icon when work is due or complete. See Asset Icons for more information on adding new icons.
-
Business Line - Determine which Business Lines this asset class should be available. Not all asset classes belong under a Water Business Line for example.
-
Workflows- Determine which workflows should be available to the assets added to this class. Each asset added to this asset class will have these workflows available for selection and assignment. See
Setting the Default Workflow for an Asset Class
for more information.
-
Stakeholders- Determine which Stakeholders should be notified when additions and updates are made to each asset added to this class.
Advanced
-
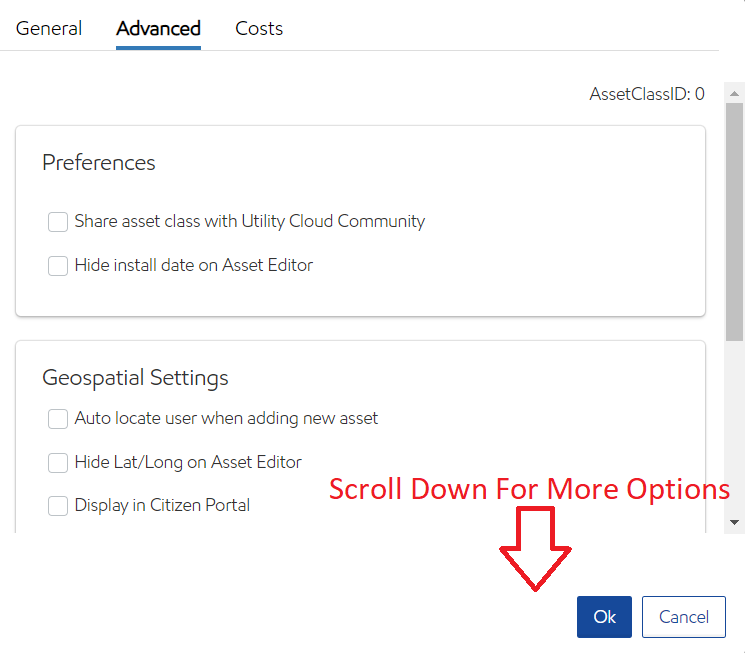
Preferences
-
Share asset class with the Utility Cloud Community - Checking this box will allow other Utility Cloud users from all customers to copy this asset class to use in their own system. They can only see the asset class and its configuration and not your specific assets or information.
-
Hide install date on Asset Editor - Utility Cloud automatically assigns an install date to each asset added. This is not applicable in some cases. Check this box to hide it when assets are added
-
-
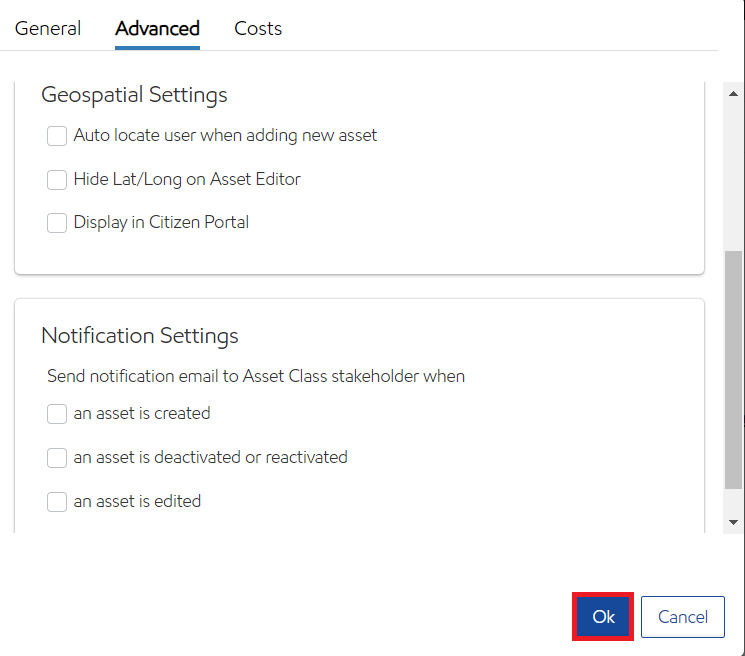
Geospatial Settings
-
Auto locate user when adding a new asset - If the user is working online when they are adding assets, this will automatically locate their position without requiring them to enter an address to obtain the latitude and longitude of the asset.
-
Hide Lat/Long on Asset Editor - Some assets do not require latitude and longitude to be tracked. Check this box in those cases.
-
Display in Citizen Portal - This does not apply to most users.
-
-
Notification Settings - Determines when an email should be sent to assigned Stakeholders
-
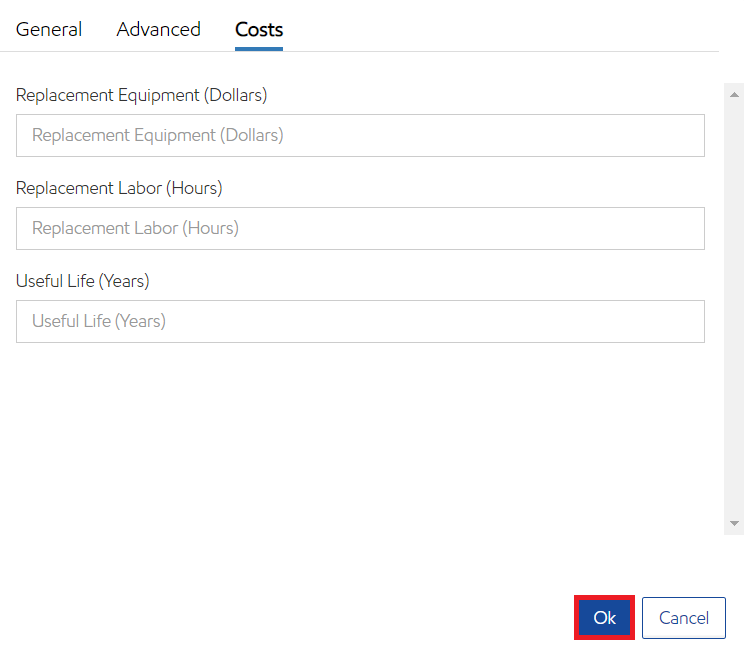
Costs - These fields can be used to track and report on the cost of equipment, labor, and the useful life of an asset. This applies to all assets added to this class.
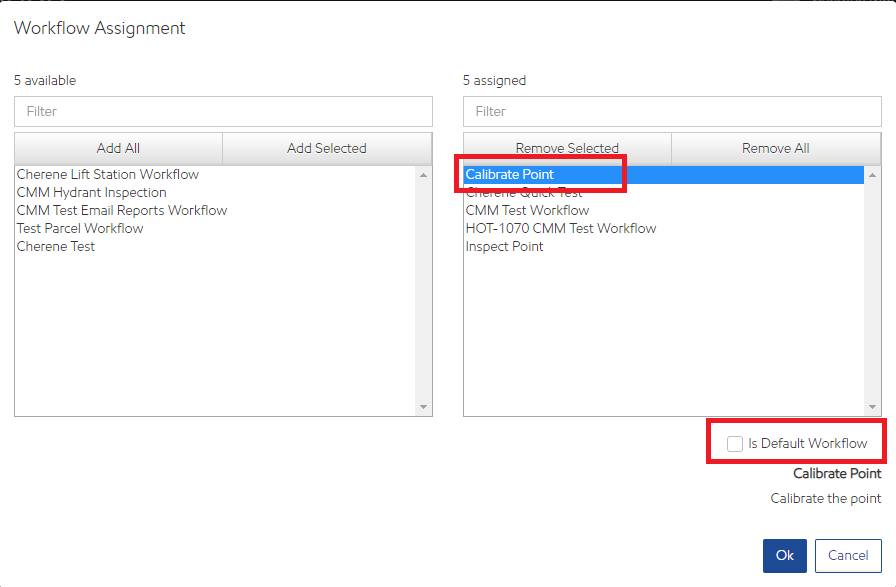
Setting a Default Workflow for an Asset Class
Setting a default workflow for an asset class is helpful when using routes as the selected workflow will automatically be selected when an asset is added to a route.
From the Settings page of the Asset Class, select the pencil in the Workflows section.
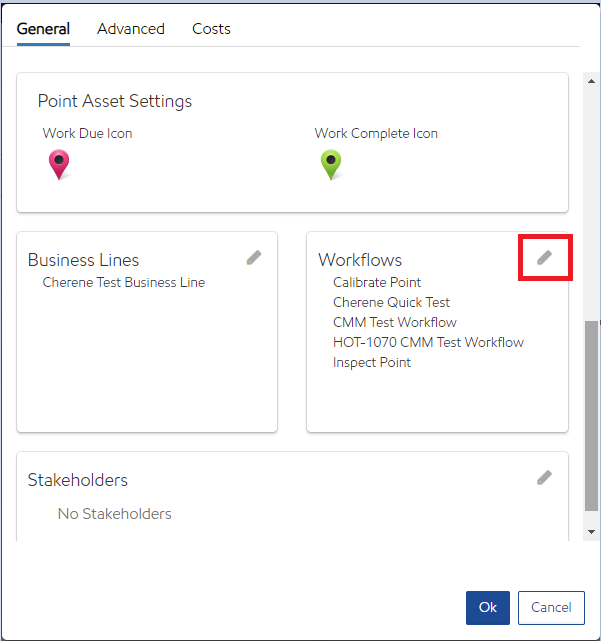
Select the workflow on the right side of the screen and check the Is Default Workflow checkbox.
Search for an Asset Class
Quick Steps to Search for Asset Classes
-
Select the Asset Class Tile from the Dashboard or select it from the left navigation bar.
-
Enter the Name of the Asset Class in the search box.
-
Select the magnifying glass or press "Enter" on the keyboard.
-
From the results that populate select the desired Asset Class.
Security Rights Required: View Asset Classes
To view the results in card view, select the card icon:
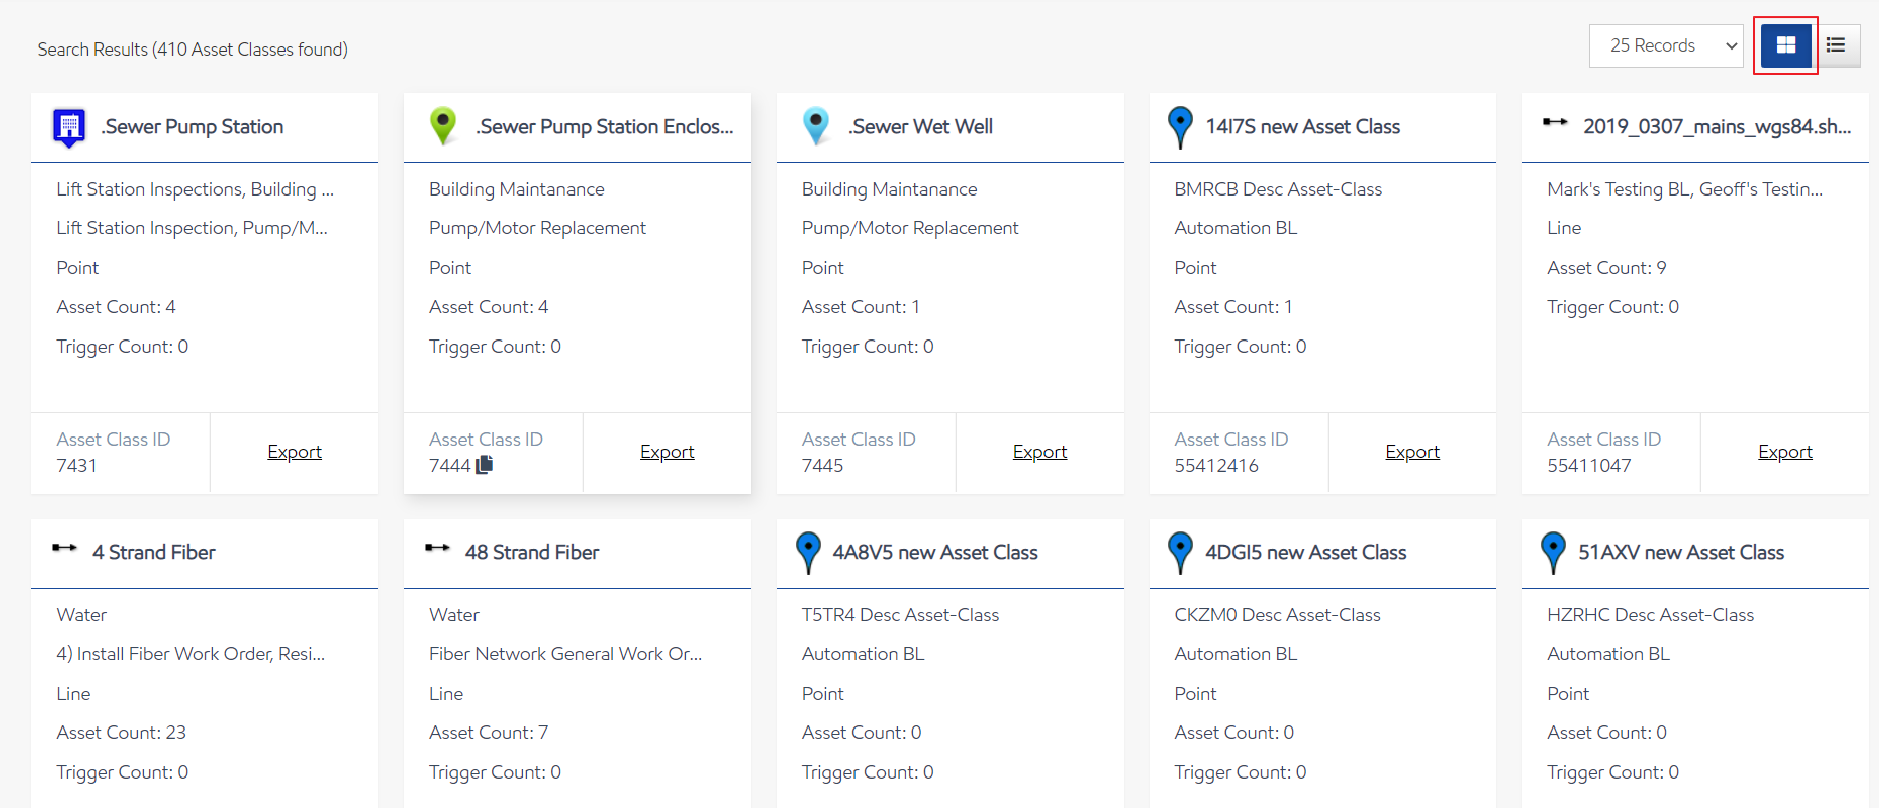
In card view, the asset class card shows:
-
Asset Class Name - the name of the asset class.
-
Asset Class Description - description of the asset class.
-
Business Line(s) - all business lines associated with the asset class.
-
Workflows - all workflows associated with the asset class.
-
Asset Class Type - whether an asset class is a point, line, polygon, or sequence type.
-
Asset Count - the number of assets in the asset class.
-
Trigger Count - the number of triggers on the asset class.
-
Asset Class ID - the ID of the asset class.
To view the Asset Classes in a list, select the list icon.
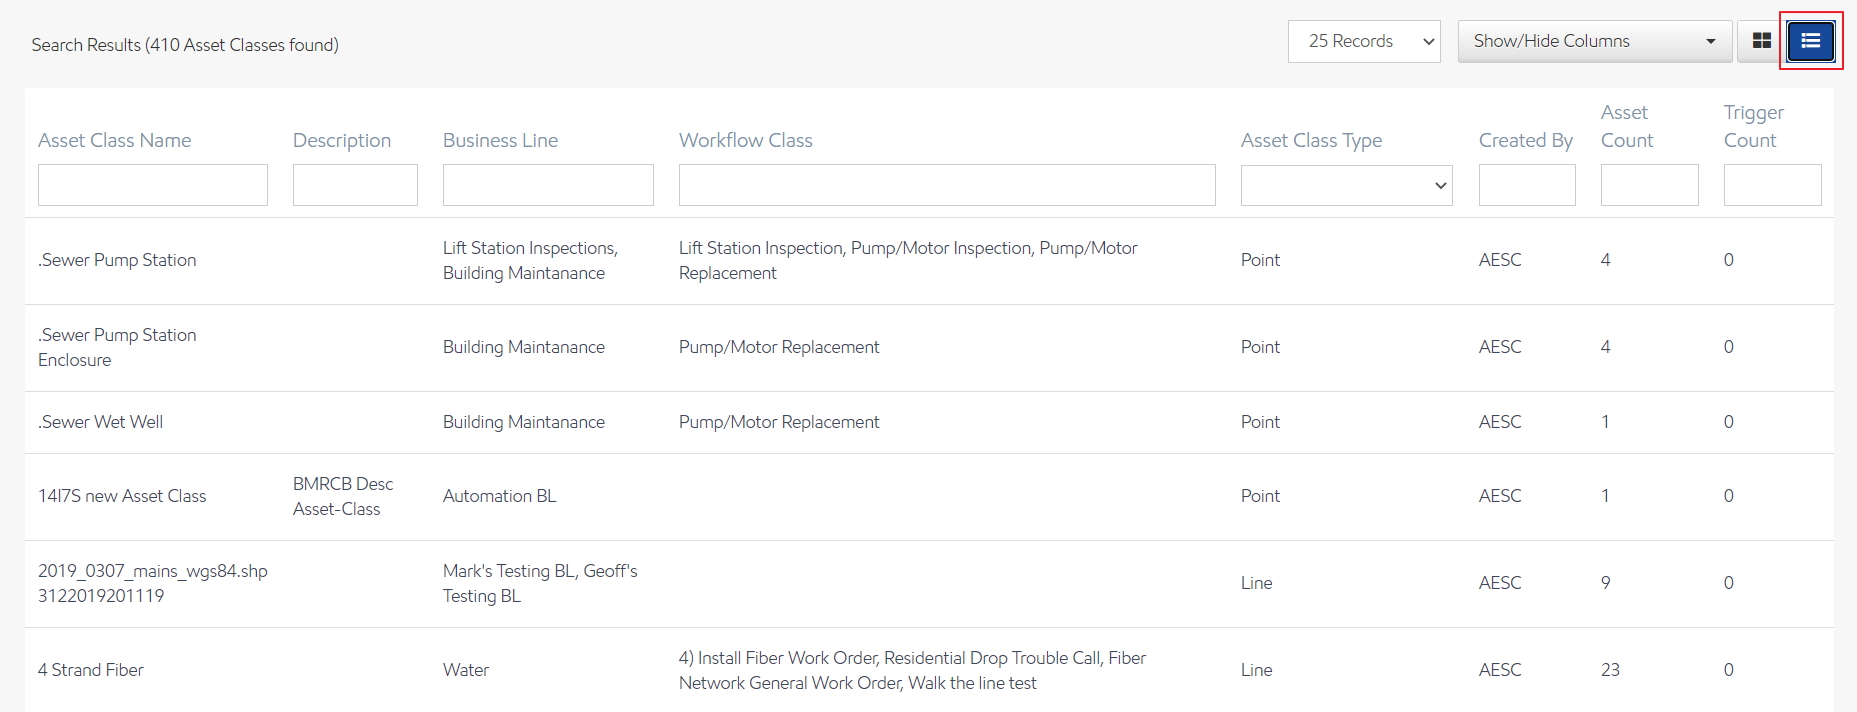
List view shows all the same fields as card view as table headers, and users are additionally able to filter and sort by those fields.
Edit an Asset Class
Quick Steps to Edit an Asset Class
-
Select the Asset Class Tile from the Dashboard or select it from the left navigation bar.
-
Search for and Select the Asset Class that requires updating.
-
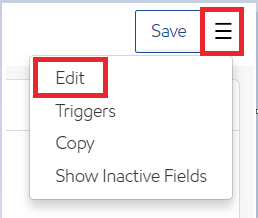
Select the Triple Bar in the upper right corner.
-
Changes can be made to the General Settings, Advanced Settings, or Costs here.
-
Select Save to Save changes.
Security Rights Required: View Asset Class, Edit Asset Classes
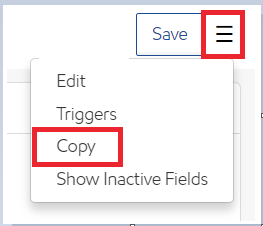
Copy an Asset Class
Quick Steps to Copy an Asset
-
Select the Asset Class Tile from the Dashboard or select it from the left navigation bar.
-
Search for and Select the desired Asset Class to copy.
-
Select the Triple Bar in the upper right corner.
-
Assign General Settings, Advanced Settings Preferences, and Costs.
-
Select Save.
Security Rights Required: Copy Asset Classes
Detailed Steps to Copy an Asset Class
An Asset Class must be created before creating Assets. A User may choose to Copy Asset Classes that will have several common General Settings, Advanced Settings Preferences, and Costs.
From the Dashboard or the left navigation bar, the user will select the Asset Class tile. This tile will provide the user with a list of all the Asset Classes in their Utility Cloud Accounts. The user may choose from the list of Search Results or type the name of the Asset Class in the Search bar. The user may also view other Asset Classes by selecting the Browse tile to view additional Asset Classes.
Once the user has identified the Asset Class to Copy select to open the Asset Class and select the down arrow next to the Settings button and select Copy. Confirm the General Settings, Advanced Settings Preferences, Costs, and Attributes. Select Save to Save New Asset Class
Asset Class Triggers
Asset Class Triggers allow you to streamline operations by automatically performing actions based on values in an asset. Depending upon one or more Conditions, one or more Actions can be performed.
Conditions Available
-
Select Always if the action should occur whenever the asset is edited.
-
Select an attribute, and select the comparison type for the attribute.
-
Reported Value — the action occurs based on the value of a single attribute.
-
Compared Value — the action occurs based on a comparison between the selected attribute and another attribute on the asset.
-
Expression — the action occurs based on a comparison between the attribute and an expression.
-
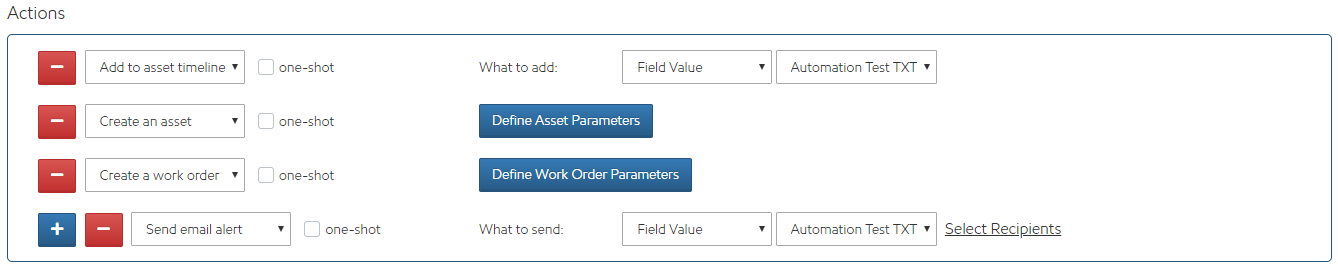
Actions Available
-
Add to asset timeline — when the conditions are met, a note is added to the asset timeline containing a single field value, all asset attributes, or a custom message.
-
Create an asset — when the conditions are met, an asset is created in the current account or a different account of the same Business Line.
-
Create a Work Order — when the conditions are met, a work order is triggered on the current asset or another asset.
-
Send email alert — when the conditions are met, an email is sent to the selected recipients containing a field value or a custom message.
-
One-shot — for all actions, define the behavior of the trigger according to the following table.
|
|
One-shot=true |
One-shot=false |
|---|---|---|
|
Condition=always |
The trigger fires only the first time the edited/created asset is saved. |
The trigger fires every time the edited/created asset is saved. |
|
Condition=true expression |
The trigger fires the first time the edited/created asset is saved.
(And again one time for subsequent true->false->true transitions) |
The trigger fires every time the edited/created asset is saved. |
Steps to Create Asset Class Triggers
Select Asset Class from the Dashboard or from the left navigation bar.
Select the desired search criteria to find the specific Asset
Select the Asset Class to access the Asset Class Editor screen.
Select the menu icon and select Triggers.
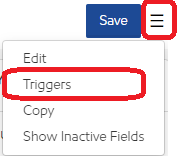
The Triggers page appears.
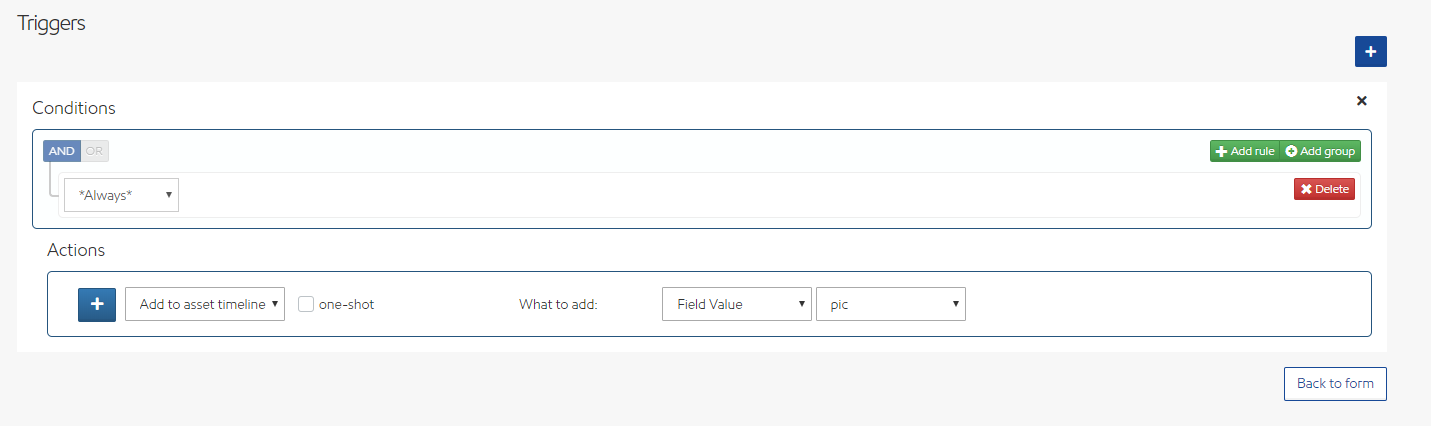
Select the Condition(s) that trigger an Action. Select Add Rule or Add Group to further refine the trigger conditions.
Select the 
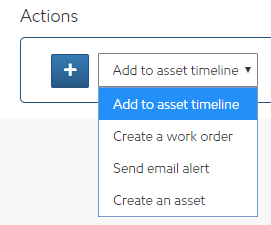
Select the Action(s) to take when the condition is met.
After choosing an action, complete the information as follows:
Check one-shot, to control how often the trigger executes (see detailed description above).
-
Add to asset timeline
-
Select What to add:
-
Field value — select the field
-
Custom message — enter the message
-
-
-
Create an asset
-
Select Define Asset Parameters. The Create Asset Trigger dialog box appears.
Note: See Create Asset Trigger dialog details for more information. -
Fill in Trigger, Field Mapping, and Location settings.
-
Select Save to create the asset trigger or Cancel to exit without creating the trigger.
-
-
Create a work order
-
Select Define Work Order Parameters. The Create Work Order Trigger dialog box appears.
-
Choose Current Asset or Other Asset and complete the work order information.
-
Select Save to create the work order trigger or Cancel to exit without creating the trigger.
-
-
Send an email alert
-
Select What to send:
-
Field value — select the field
-
All Asset Attributes
-
Custom message — enter the message
-
-
Select Select Recipients and enter email addresses or select from the list.
-
Select Save to save the trigger definition.
Create Asset Trigger dialog details
Enter information in the Create Asset Trigger dialog box to define fields in the asset being created.
Trigger Tab
On the Trigger tab, specify the asset class of the asset being created.
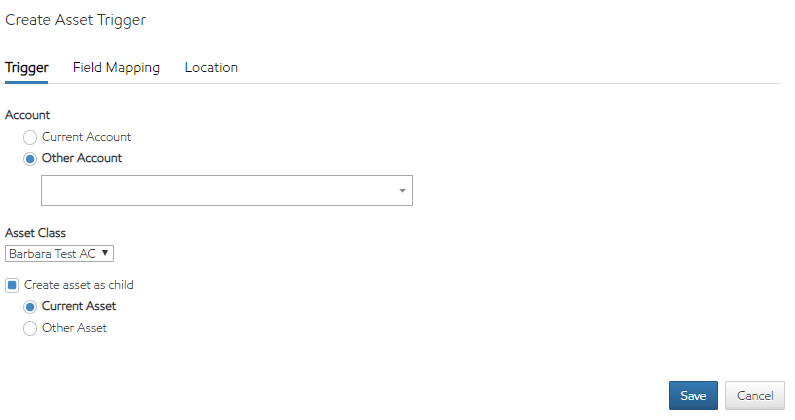
You can choose an asset class from your current account or another account of the same business line.
You can choose to create a new asset as a child. It can be a child of the current asset or another asset.
Field Mapping Tab
On the Field Mapping tab, specify how to fill in the fields of the asset being created.
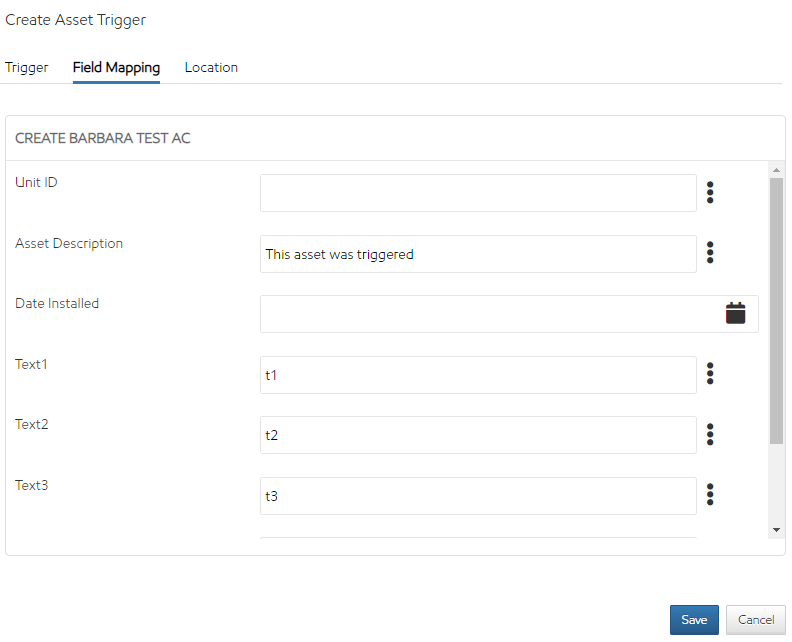
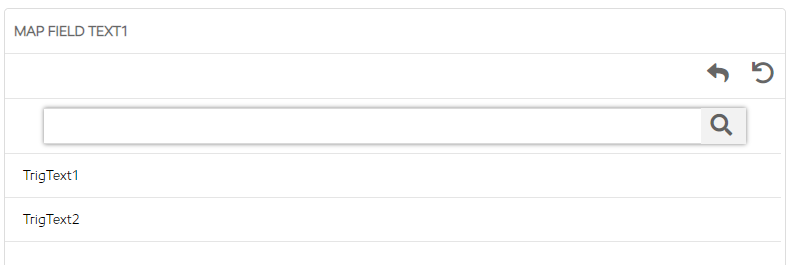
You can enter values in the fill-in fields, or select the ellipsis to choose from a field of the same type in the triggering asset or workflow to populate the value.
Location Tab
On the Location tab, specify the location of the asset being created, if the asset class is not geospatially enabled.
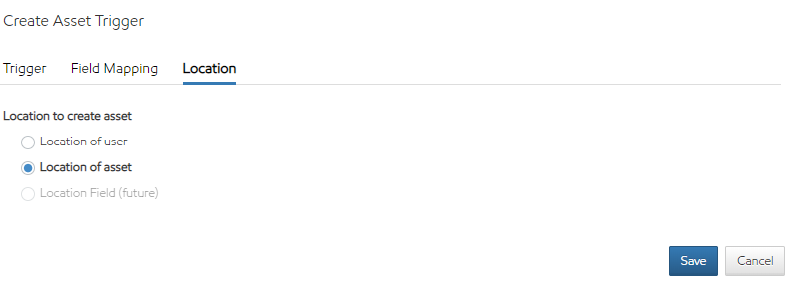
Select the Location of the user (default) to place the new asset at the location of the user when the asset creation is triggered.
Select the Location of an asset to place the new asset at the location of the source asset.
Changing the Asset Class on a Group of Assets
-
Select Asset Tile from the Dashboard or select it from the left navigation bar.
-
Find the Asset that needs to be moved.
-
Select the Asset.
-
Select the Edit button.
-
Change the Asset Class by selecting the Asset Class box and selecting the new Asset Class.
-
Select Save at the bottom of the screen.
NOTE: A new section will display on the Asset Details page for that asset which will display "Previous Attributes"
Security Rights Required: Can Change Asset Class on Asset
Export an Asset Class
To Export an asset class, search for the asset class and select the Export link on the tile.
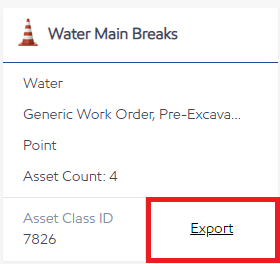
A Microsoft Excel sheet is created with all data regarding the asset class including general information about the asset as well as custom attributes.
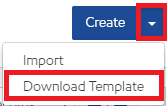
Import an Asset Class
To Import an asset class, first, download a template by selecting the down arrow next to the Create button and select 'Download a Template'. A Microsoft Excel sheet is created with all data regarding the asset class including general information about the asset as well as custom attributes.
Fill out the spreadsheet with the desired information and save it locally.
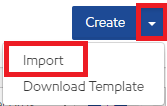
From the Asset Class search screen, select the down arrow next to the Create button and select "Import'.
Browse to the file that contains the asset class information and select Upload.
Update an Asset Class Using Importing and Exporting
Locate the Asset Class to be updated and select the Export link on the tile. A Microsoft Excel sheet is created with all data regarding the asset class including general information about the asset as well as custom attributes. Update the desired information and save it locally.
From the Asset Class search screen, select the down arrow next to the Create button and select "Import'.
Browse to the file that contains the asset class information and select Upload.
Related articles
Filter by label
There are no items with the selected labels at this time.