Assets
Key Points to Assets
- Designated area where you can go to view your assets.
- Enables you to view and edit all information relating to an asset (Attributes, History, Attachments, Notes, Relationships).
- Allows you to Create, Import, Export Asset data.
- Allows you to Search for a unique asset or group of assets.
Detailed Description of Assets
The Assets tile is a centralized location to review assets, and view and edit all details associated to that asset. The search results allow you to see which workflows are associated with an asset, and quickly access the details or schedule a work request. When searching for assets, you can check the box to how Active Only, or leave the box unchecked to show both active and inactive assets. Search results give you quick access to view and edit the Details of each asset. You may also choose between a card view and a table view.
Create an Asset
Quick Steps to Create an Asset through the Assets Tile
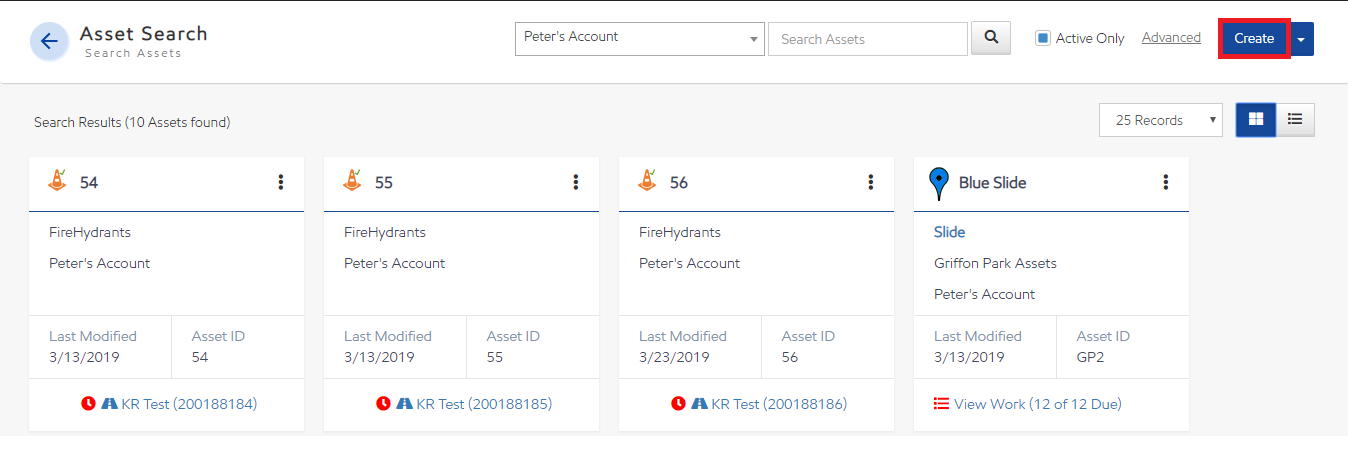
- Select the Assets tile from the Landing Page or from the quick navigation menu.
- Select an Account from the drop down.
- Select Create.
- Select the Asset Class the Asset belongs to and select Create.
- Drag and drop on the map to the location of the Asset.
- Complete the Asset Details Page.
- Select Save.
Security Rights Required: Create Assets
Video
Add-Edit Asset Through Assets
Quick Steps to Create an Asset through the Map
- Select the Map tile from the Landing Page or from the quick navigation menu.
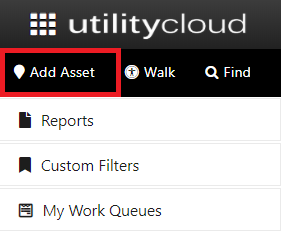
- Select Add Asset.
- Select which Account and Asset Class for the new asset, and select Next.
- Drag and drop the marker on the map to the location of the Asset.
- Fill in Asset Information and Attributes.
- Select Save.
Details for Creating an Asset through the Assets Tile or Map Tile
Adding new assets requires the Security right Create Assets. When creating an Asset through Map or Assets, you are prompted to fill out the Asset Create details tab:
- Asset ID: The asset ID is used to identify an asset when searching for it.
- Account: The account is already be chosen and nothing needs to be done to this section.
- Asset Class: In the previous section you chose an Asset Class. If the wrong Asset Class was chosen, you can change.
- Asset Description: The Asset Description is used to describe the Asset for future searching.
- Date Installed: List the date asset was installed, if known.
- Parent Asset Key: Leave blank if the Asset is not a part of a relationship. If the parent is known, type the key here to link the Assets.
- Asset Tag: If Asset has an Asset Tag, type the code here to link the Asset to the Asset Tag for Scan and Go.
- Attributes: Predefined Attributes of the asset. Fill in, if applicable.
- Locate your Asset: Either drag and drop, locate, find an address, or enter coordinates to locate where your asset is positioned.
Asset Attachments
- Select the Assets tile from the Landing Page or from the quick navigation menu.
- Search for and Select an Asset.
- Scroll down to Attachments panel.
- Right click on the asset folder.
- Create - Create new sub folders.
- Delete - Delete folder or attachment.
- Edit - Edit or Rename attachment (the folder names may NOT be edited once created).
- Upload - Upload additional files.

Quick Search for Assets
Quick Steps to Quick Search for Assets
- Select the Assets tile.
- Select the dropdown to choose the Account the Asset is associated with.
- Enter search criteria in the search text box.
- Select the Search button (magnifying glass). Once loaded results load below in either card or list view.
Security Rights Required: View Assets
Search Results - Card View
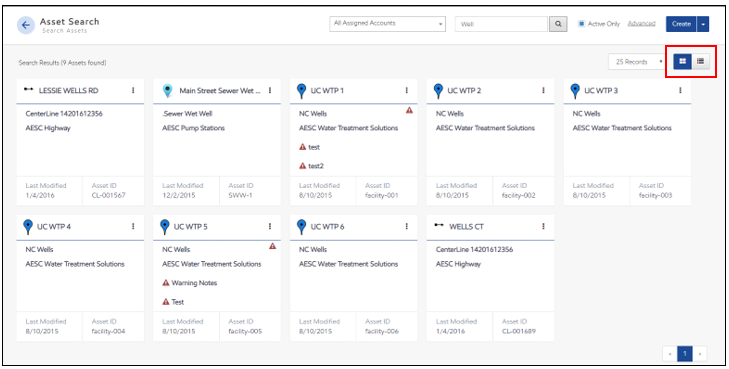
Search Results - List View

Advanced Search
Quick Steps to Advanced Search for Assets
- Select the Assets tile.
- Select the drop down to choose the Account the Asset is associated with.
- Select Advanced to create simple or multi-attribute search criteria.

Advanced search allows you to combine keywords with operators such as AND and OR to produce more relevant results.
Enter your search criteria and select Search. The results are shown below. You can select to view results in card or table view.
Security Rights Required: View Assets
Detailed Steps to Advanced Search for Assets
Advanced search allows you to create simple or multi-attribute search criteria. Advanced search allows you to combine keywords with operators such as AND and OR to produce more relevant results. Depending on the field criteria selected, additional options become available: equal, not equal to, begins with, doesn't begin with, contains, doesn't contain, ends with, doesn't end with, is empty, is not empty.

- Enter in search criteria in the Advanced Search area. Select the field to match from the drop down, and then specify the rule.
- Use the Add rule or Add group of rules buttons to further specify the search.
- Select Search to perform the search.
To save a search, select Save and choose Save As to name the search. The name has to be unique across the billing account.
To use a saved search, select the Saved Search drop-down and select the desired search to run.

Shared Searches
Users can share saved searches with other Utility Cloud users in their billing account.
Steps to Share/Edit a Saved Search
To share a saved search or change the sharing settings:
- Select the saved search in the drop-down.
- Select Edit.
- Choose one of the three shareable options available:
- Only Me: search will only be visible in the Saved Search dropdown to its creator.
- Specific Users: search will be visible in the Saved Search dropdown to its creator and all selected users.
- Everyone: search will be visible in the Saved Search dropdown to its creator and all other users in the billing account.
- Select Save
In order to edit a saved search shared with the user that the user did not create, user must have the security right “Can Share Saved Searches”. Otherwise they must save a copy of the search using Save As.
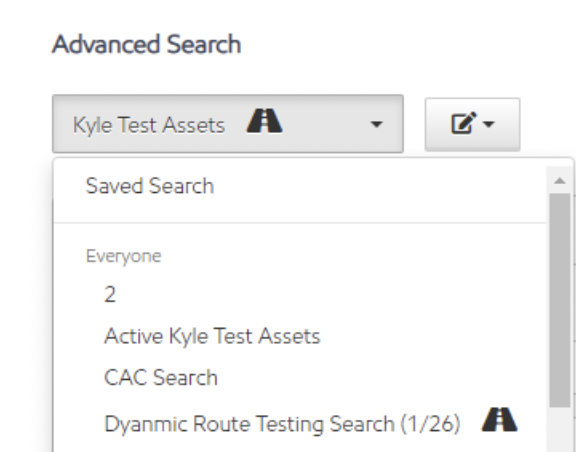
If a saved search is used in a dynamic route then the "route" icon is displayed next to the name of the saved search in the "Saved Search" drop-downs:
Security Rights Required: Can Share Saved Searches
Steps to Delete Saved Search
To delete a shared saved search:
- Select the saved search in the drop-down.
- Select Delete.
- If the shared saved search is not used in a dynamic route, user must confirm the deletion.
- If the shared saved search is used in a dynamic route, user must remove it from all dynamic routes it is used in before being able to delete it.
NOTE: Users can delete any saved searches they created without the security right "Can Delete Saved Search".
Security Rights Required: Can Delete Shared Search
Quick Navigation from Assets Search Results
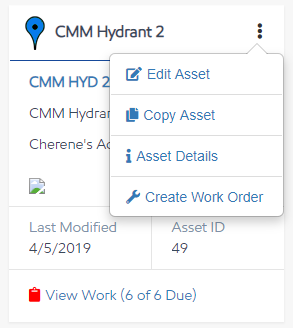
Select the ellipsis at the top of the Asset tile, then select your option.
Edit an Asset
Quick Steps to Edit an Asset
- Select the Asset tile from the Landing Page or from the quick navigation menu.
- Choose the Asset to be edited.
- Select the ellipsis at the top of the Asset tile, then select Edit Asset. The Asset Editor page appears.
- Make your edits, then select Save to save your edits, or Cancel to exit the editor without saving.
Security Rights Required: Edit Asset
Copy an Asset
Quick Steps to Copy Assets
- Select the Asset tile from the Landing Page or from the quick navigation menu.
- Choose the Asset to be copied.
- Select the ellipsis at the top of the Asset tile, then select Copy Asset. The Asset Editor page appears with a copy of the asset.
- Make any edits required to the copy, then select Save to save your edits, or Cancel to exit the editor without saving.
Security Rights Required: Copy Asset
Create Relationships between Assets
Quick Steps to Create a relationship between Assets
- Select Asset tile from the Landing Page or from the quick navigation menu.
- Find the Parent Asset.
- Select the Asset.
- Scroll down to the Relationships section.
- Select the Edit button (pencil).
- Select +Add. The Search for Asset dialog box appears.
- Use the asset search to find the Child Asset.
- Select the asset.
- Select Save.
- The asset appears as a child in the relationship tree on the Asset Relationships tab.
- If the asset has a schematic, floor plan or other image, drag and drop the child’s asset icon to the appropriate location.
Security Rights required: Edit Assets
Video
Asset Relationships


Detailed Steps to Creating a relationship between Assets
The Asset Relationships section allows the user create, edit and visualize relationships between Assets, as well as locate the asset on a schematic, floor plan or other image.
Prior to being able to perform this function, the Edit Assets right needs to be assigned. If you need this right to manage asset relationships.
Asset Relationships
The Asset Relationships section is accessed through the Asset Details option (as opposed to the Edit option) for the selected asset. From the Asset Relationships section of the Parent Asset, select the + button to open the asset search dialog to find the Child Asset.
Search for the Child Asset
Once the Asset has been located, select it. You are prompted to confirm this action. Cancel from this message and the assets remain unlinked; select OK to proceed with creating the parent/child relationship. Once the relationship is created the relationship is visible in the tree view of the Asset Relationships section. The asset key of the parent asset is displayed on the Asset Editor for the child asset in the Parent Asset Key field.
View Child Asset
From a Parent Asset, you can quickly access the Asset Details of any child asset. In the Asset Relationships section, select the link icon on the child asset in the relationship tree to navigate directly to the Asset Details for that asset.
View Parent Asset
From a Child Asset, you can quickly access the Asset Details for the parent asset. In the Asset Relationships section, select the up arrow ^ in the upper right corner to navigate directly to the Asset Details for the Parent Asset.
Parent Asset Key
A parent/child relationship can also be created by manually entering the internal asset key of the parent asset in the Parent Asset Key field on the Asset Editor for the child asset. Once the Asset is saved, the parent/child relationship is shown on the Asset Relationships tab in the tree.
Importing Assets
Key Points to Importing Assets
Assets can be added using several methods.
- Manually - See the Create an Asset section of this page.
- Microsoft Excel Spreadsheets - See the Detailed Description on Importing Assets via Microsoft Excel section of this page.
- GIS Shapefiles - See Key Points to Shapefiles section of this page.
- ESRI Online Subscription Links - See Esri ArcGIS Integration
Detailed Description on Importing Assets via Microsoft Excel
Utility Cloud offers two user friendly ways to bring your assets into Utility Cloud. Whether your business stores all of their information within GIS or Microsoft Excel, Utility Cloud provides a free platform to bring your assets into Utility Cloud to perform work or visualize your assets in the field. It is just as easy to bring your assets into Utility Cloud as it is to export them out. Utility Cloud provides the capability to import your assets via Microsoft Excel or Shapefile, to provide your business with the most up-to-date data and store them within an internal database.
Important Notes:
- Each asset must have a unique ID. Example for Water Hydrants (WH-1, WH-2, WH-3 etc)
- Ensure all necessary asset attributes have been created in the Asset Class.
Quick Steps to Importing Assets via Excel
- Select the Asset tile from the Landing Page or from the quick navigation menu.
- Select Create.
- Fill out Asset Class information and have the Asset Class Attribute names match the Attributes from the Excel File.
- Return to the Landing Page and select the Assets tile.
- Asset Class Triple Bar Import
- Select "Download a Blank Template"

- Open up the Blank Template and Copy and Paste the Attributes into the appropriate rows.
- Fill out the Account Name, Asset Class with the correct names. Assign the Asset Description and Asset ID with names of your choice. The fields of Stakeholder Email, Is Active, ParentAssetKey, Install Date and Parent Asset Key are optional.
- Once file is filled out save the file and open up the Asset tile in Utility Cloud.
- Select the Import button and choose the file to import into Utility Cloud. All Assets will be uploaded when import is complete.
NOTE: Importing is limited to a maximum file size of 5000 rows. If you have more than 5000 assets to import, divide your file into two or more files.
Security Rights Required: Import Assets, Export Assets Blank Spreadsheet
Detailed Steps to Importing Assets via Excel
When uploading new Assets from Excel you are able to add assets to an existing Asset Class or create a new Asset Class to add the assets to by following the steps above. Before downloading a blank template make sure the Asset Class information will allow you to import the correct data. If you are creating a new Asset Class or adding to an existing Asset, make sure that you leave the Automate Asset ID section on the Asset Class Details empty until after importing. Another thing to watch out for is on the Attributes tab in the Asset Class. Be careful on the Type of attribute it is. There will be no errors if all the attributes are text field when importing. If an attribute is set to a multiple choice type and one of the imports that belong in the column does not match the one of the multiple choice option then there will be an error while importing. Another common error is when an attribute is set to a number type and within the excel file in that column there is text or symbol with the number. If there is anything but a number in the column of a number type there will be an error while importing. To ensure accuracy while downloading follow these detailed steps.
Reorganize Assets in the Tree
To reorganize the assets in the asset relationship tree, change the value in the ParentAssetKey column by entering an AssetID for the new parent asset.
Remove Assets from the Tree
To remove the assets from the tree, remove the ParentAssetKey value in the spreadsheet.
Key Points to Shapefiles
Shapefiles allow the use to quickly import or export Asset data. It can update an existing Asset Class with new Assets or it can create a new Asset Class with all the Assets.
Important Notes:
- Need to be provided in the WGS1984 projection.
- Include any asset attributes. For example, if the file contains vehicles, the asset attributes might include the make, model, color, vin number etc.
- Each asset must have a unique ID. No 2 IDs in the system for your Utility Cloud can be the same. Example for Lift Stations (LS-1, LS-2, LS-3 etc)
- Need at least one asset class in the system before importing Shapefiles. Example (UC-Test)
Quick Steps to Create an Asset through Shapefiles
- Select the Assets tile from the Landing Page or from the quick navigation menu.
- Select the Shapefile icon, Import - Upload Shapefile
- Select Choose File and select compressed shapefile from computer; select Upload.
- Verify that the correct shapefile has been selected
- Select the shapefile headers to be used as the Asset ID Attribute
- If shapefile does not contain unique ID select Generate New. Example for Hydrants make the ID “HYD-“. The numbers following will be auto generated.
- Choose New Asset Class or Update Existing
- Select Account to own new assets
- Create Asset description using header fields from shapefile
- Select header field to be used as the Install Date, or set alternate date
- Validate the Import Job, this will run through the shapefile to check for non-compliance
- Select Schedule Job. This will convert the Shapefile to an Asset Class on import.
Security Rights Required: Import Assets, Export to ESRI
Detailed Steps to Import Assets via Shapefiles
When uploading new Assets from a shapefile, a new Asset Class is created.
When uploading a Shapefile, the Shapefile has to be compressed into a zipped file. When uploading the Shapefile the User will be asked to choose the asset description for each asset. The User can choose to use an attribute of an asset. The attributes that were in the Shapefile are transferred into Utility Cloud that can be modified by going into the Asset Class tile, then selecting the Asset Class and modifying the information on the Details and Attributes Tab.
If a User has KML files.
KML files cannot be brought directly into Utility Cloud. To bring a KML file into Utility Cloud, it has to be converted into a Shapefile. In order to convert a KML file into a Shapefile, open ESRI GIS ArcMap. Search for KML to Layer (Conversion).Once the KML is saved as a layer the KML will appear on the map. Right click the layer and go to Data and choose Export Data and choose Shapefile as the file type.
Adding assets with GIS Shapefiles
Shape files need to be provided in the WGS_1984 projection
Assets within the shape file need to have a unique id associated with each asset for import. These id’s cannot be the across different asset classes. For example; the asset ids on hydrants may be specified as HYD-1, HYD-2, HYD-3, etc. and the asset ids on water mains may be specified as WM-1, WM-2, WM-3. etc.
Steps to Adding assets with GIS Shapefiles
- From the Landing Page or from the quick navigation menu, go to the Assets tile.
- Select the Shape file Import/Export Button
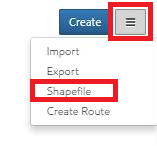
- Upload Zipped Shape file > Select Choose File > Once selected select Upload (This must be a .zip file)
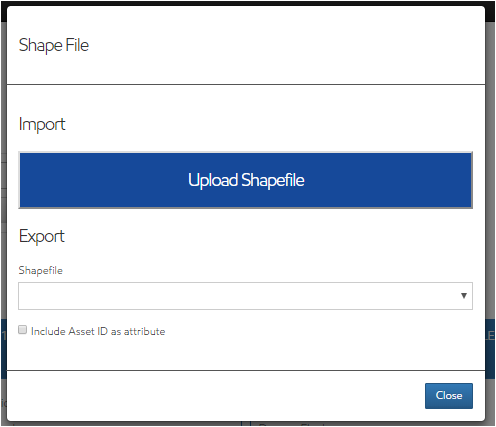
- Select Shape file - .shp should default but may be selected as well
- User will see a confirmation of the Type of asset, Name of the asset class to be created, Count or number of assets being brought in, and the Projection = GCS_WGS_1984
- Asset ID Attribute - Select a shape file attribute that serves as each asset's globally unique identifier. We will set the asset's id to this value when adding new assets and use it to match (join) assets when performing an update.
- Import Type - Choose New or Updates
- Select Account - Choose the account to assign this asset class to from a drop down menu
- Setup Template
- Use text and attribute (columns) names from shape file enclosed in brackets to instruct Utility Cloud to write the value using the bracketed column(s) defined.
- Install Date Field (a column header from shape file)
- Install Date Alternate
- Validate the Import Job - Once this is selected Utility Cloud will validate the zip file upload to ensure there are no errors
- Errors will be displayed, if there are ANY errors the job will not process. Updates must be made prior to the assets being uploaded into Utility Coud
- Schedule the Import Job - Sends the Job to Utility Cloud, progress can be reviewed through the gear icon in the quick navigation bar
Exporting Assets
Quick Steps to Export Assets
- Select the Asset tile from the Landing Page or from the quick navigation menu.
- Select the down arrow button on the Asset Search screen then select Export.
- Select Submit to export all searched assets.
Security Rights Required: View Users; Export Users Search Results, Export Users Blank Spreadsheet, Export Assets Search Results
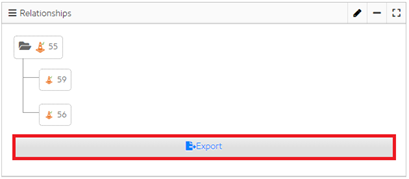
Export Assets Relationship Tree
- Locate and open the Asset Details page of the parent asset.
- Scroll down to the Relationships section
- Select Export at the bottom of that section. This will export the .XLSX file with the information about the parent asset along with all the children assets all the way down the tree. The filed “ParentAssetKey“ in the spreadsheet contains the IDs of the parent assets.
Quick Steps to export a Shapefile
- Select the Assets tile from the Landing Page or from the quick navigation menu.
- Select the Menu button
- Select Shapefile
- Select the Asset Class to be exported
- Select Export
Detailed Steps to export a Shapefile
From the Assets tile, select the Menu button and select Shapefile.

Under Export, select the Asset Class to be exported.
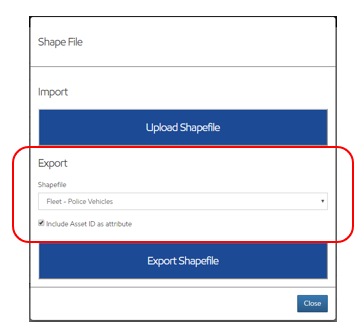
Select Export Shapefile.
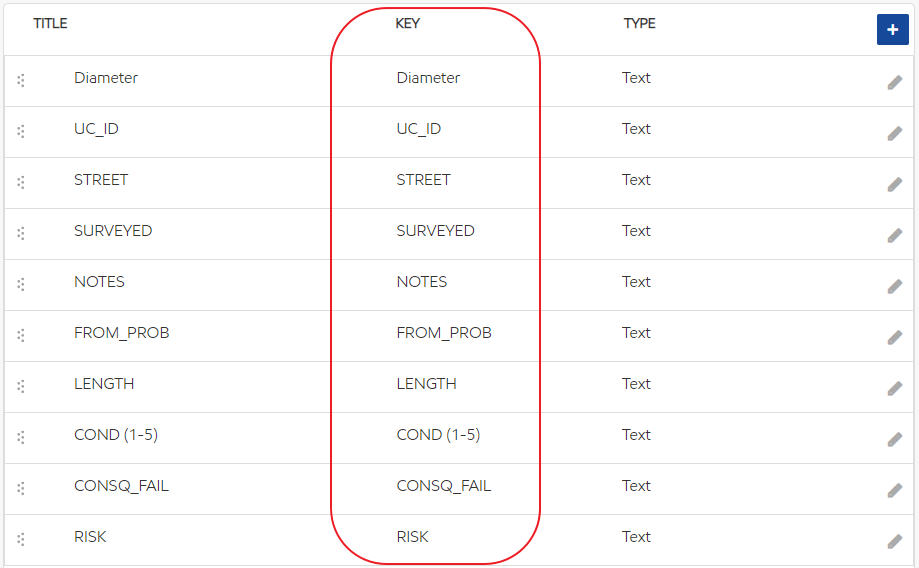
NOTE: All Asset attributes must have a KEY assigned that matches the GIS field name exactly. Asset Keys should be no longer than 10 characters and cannot have spaces.
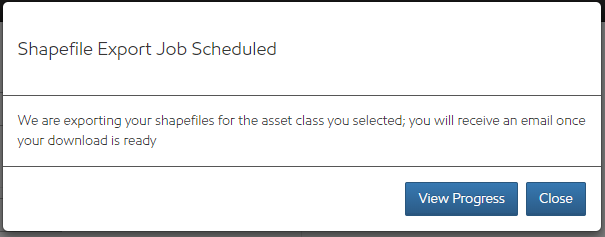
Select View Progress to see the progress of the job.
Move Assets Between Accounts
Quick Steps to Move Assets Between Accounts
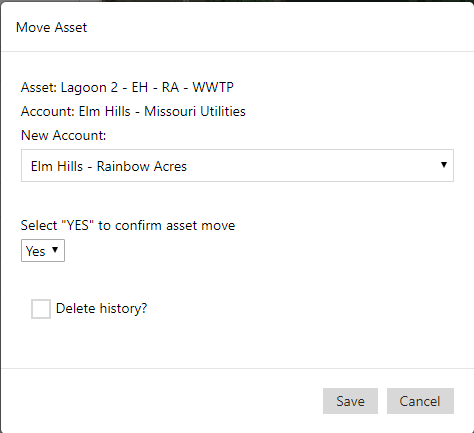
Locate and open the asset to be moved
Select Edit
Select Move
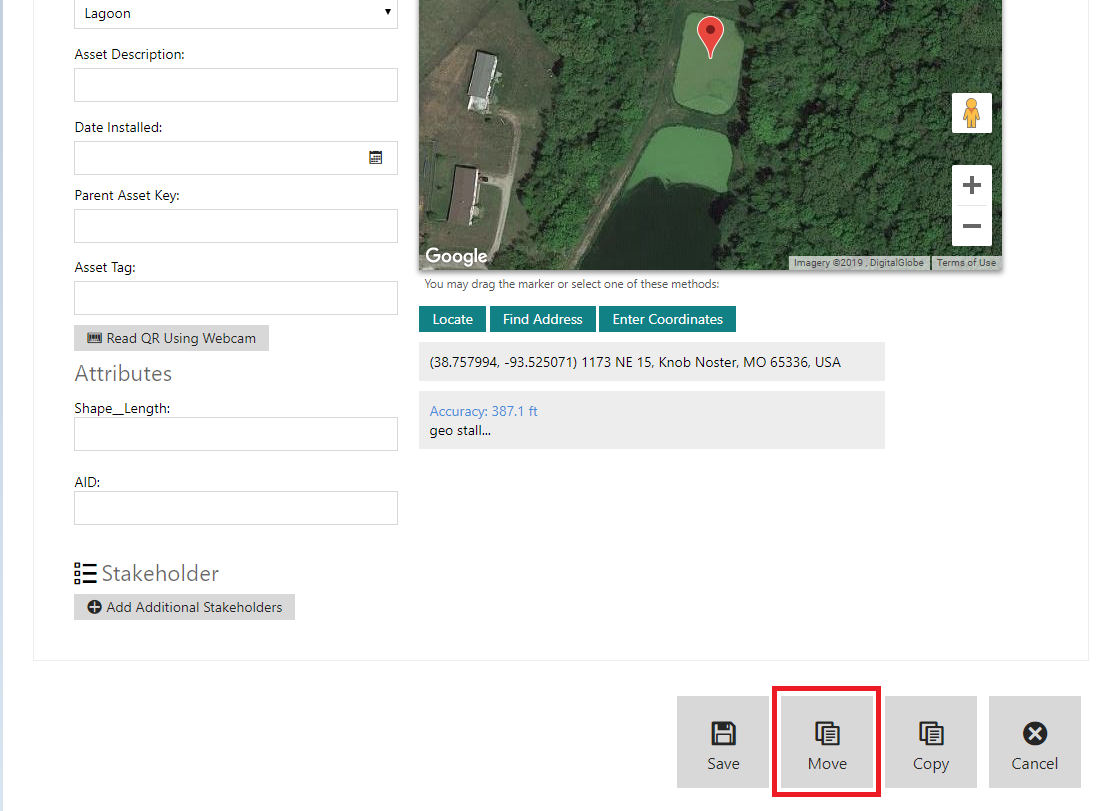
Select the new account from the drop down list.
Confirm the move
Check Delete history to delete all the work history and edit history on the asset.
Security Rights Required: Can Move Assets Between Accounts
Creating a Schematic
Quick Steps to Create a Schematic Through The Assets Tile
Select the Assets tile from the Landing Page or from the quick navigation menu.
Select an Account from the drop down.
Select the Asset you wish to create a Schematic on.
Scroll to the Schematics panel and select Upload.
Select the image you wish to use for your schematic.
Drag and Drop child assets to where you would like them to be positioned on the schematic.
Note: In order to place assets on a schematic, the assets you wish to place must be child assets of the asset with the schematic. See the Creating Relationships between Assets section of this page.
Quick Steps to Create a Schematic Through The Map
- Select the Map tile from the Landing Page or from the quick navigation menu.
- Select the Find icon and search for your asset with a schematic.
- Select the asset, then select the Schematic button in the popup.
- Select an asset to view details, complete work, or edit; OR drag and drop to move assets on the schematic.
Quick Steps to Change the Icons on a Schematic
- Select the Asset Class tile from the Landing Page or from the quick navigation menu.
- Search for the desired Asset Class.
- Select Edit.
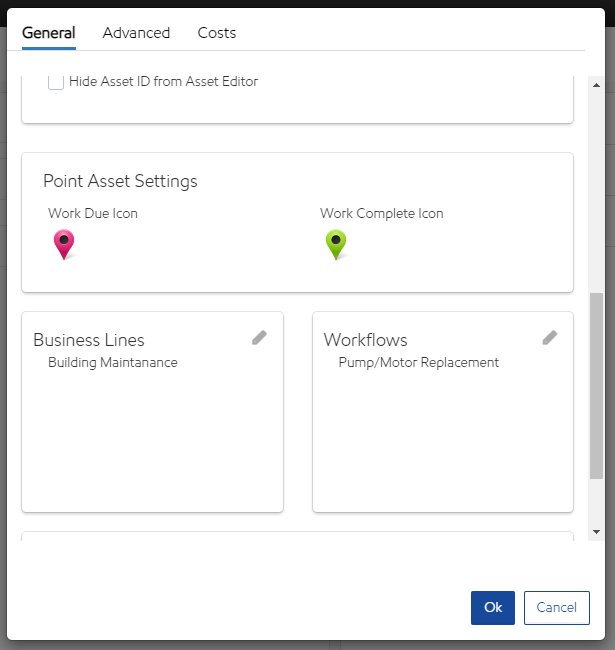
- Under Point Asset Settings, select either the Work Due Icon or Work Complete Icon, then choose a new icon.
- Select Save.
Detailed Steps to Change the Icons on a Schematic
The Icons displayed on a schematic can be changed through the Asset Class tile. Navigating to the Asset Class associated with the assets will allow the user to change the icons from a list of commonly used icons. Users can assign two different icons for each asset. One will be displayed when work is due and the other will be displayed when work is completed. Users must save the Asset Class in order for the icons to be updated on the schematic.
Asset Labels
Steps to Create Labels
- Navigate to the Asset Labels tile on the landing page.
- On the 'Asset Label Search' page that appears, use the drop-down menu to select the desired account.
- Select the 'Create' link at the top of the page.
- On the 'Asset Label Template' page that appears, enter a unique name for the label template in the “Label Template Name” field.
- Use the 'Select Print Template' to select the correct label stock.
- Utilize the Asset search bar to locate the asset(s) for which the label(s) is/are being created.
- In the 'Search Results' box, select the desired asset(s).
- Each time an asset is selected, it will appear in the layout box (located to the right of the search results box).
- Use the cursor to remove or adjust the order of the labels if necessary.
- Use the 'Add All' button to add all assets in the 'Search Results' box, and use the 'Remove All' button to remove all labels from the layout template.
- Utilize the 'Add Page' button to add an additional page to the label template.
- Select the 'Save' link at the bottom of the page to finalize the template.
