Routes
Key Points to Routes Dashboard
- A designated area where users can go to view, edit and create their routes
- Enables users to schedule batches of work orders
- Work Orders can be created on a strict or flexible schedule
- Users can order the sequence of the work to be performed
- Users can schedule work orders to view on a calendar
- The Routes Dashboard shows the user all available routes and work orders within their account.
Security Rights Required: View Routes
Detailed Description of Routes
Routes are used to group workflows and work orders together regardless of account or workflow. A route can be assigned to be completed by multiple people. Users can use a calendar to view scheduled work orders. Users can use the Route Dashboard to see the completion status of a route.
Create a Route
Quick Steps to Create a Route
- Select the Route Dashboard Tile from the Dashboard or the left navigation menu.
- Select Create
OR
- From the Asset Search screen, filter the assets to be included in the route, select the dropdown next to the Create button and select Create Route

The Create Route Wizard will display
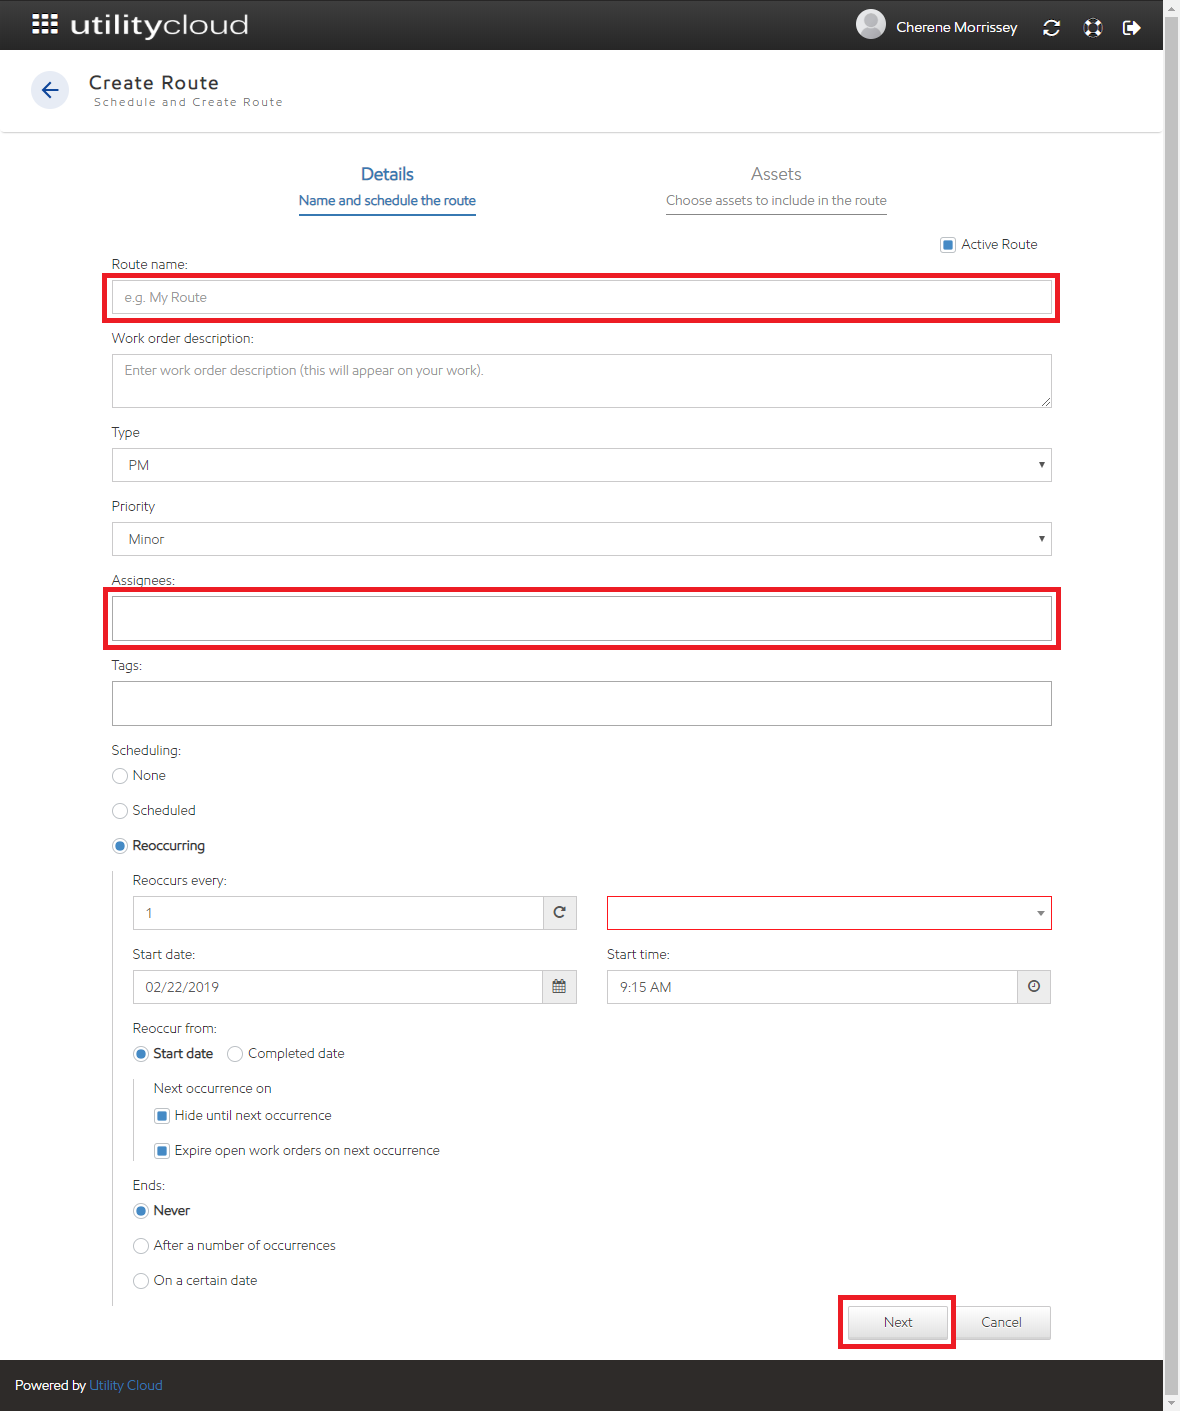
- Enter a Route Name and Assignee(s)
- Choose a Schedule, then select Next.
- Select Add Assets.
- Search for and assign assets to the route; Save
- Select sort order by drag and drop or number order
- Add additional work if desired to each asset by selecting the + to see additional work available
- Select Save.
Security Rights Required: View Routes; Create Routes; Edit Routes
Schedule
- Route Name: The user must input a route name to create the route. Route names are not specific and can be repeated. This is a required field.
- Work Order Description: The user can enter a description of the route that will appear on Work Orders.
- Type: Select the type of work being done by the Route. ( PM, Repair, Investigation, etc...) This is displayed on the work order.
- Priority: Select a priority for the route. (Minor, Major, Critical, etc...) This priority is displayed on the work order.
- Tags: Tags can be added to a route by typing two or more letters into the Tags. Multiple tags can be added to a Route. These tags are applied to every work order and show up in the Work Orders Tile.
- Scheduling:
- None: Work Orders show up as due immediately.
- Scheduled: Work Orders are created and marked as “Open” until the “Start” time has passed. After that time it is considered “Due”. Work Orders can be edited to be due at any time in the future or on the same day.
- Reoccurring
- Reoccurs Every: The number of hours, days, weeks, months, and years to increment
- Interval: Hours, Days, Weeks, Months, or Years to increment
- Start Date: The date the first set of work orders will be scheduled for this route. A Route can be scheduled to start before the current date only if the start date is within the scheduling interval. For example: If the scheduling interval is set to Months then the Start Date of the Route must be within a month of the current date. If the scheduling interval is set to Years then the Start Date of the Route must be within a year.
- Expire open work orders on the next occurrence cannot be selected when scheduling a start date before the current date.
- Start Time: The time the first set of work orders will be created for this route. It is recommended that the time be set to 5:00 AM so the work appears on the field workers list in the morning.
- Reoccur from: NOTE: The 'Reoccur From' selection cannot be changed once the Route is created.
- Start Date: The next occurrence of the work order will be created X number of hours, days, weeks, months, or years from the date entered in the Start Date/Start Time field
- Completed Date: The next occurrence of the work order will be created X number of hours, days, weeks, months, or years from the date the previously scheduled work was completed.
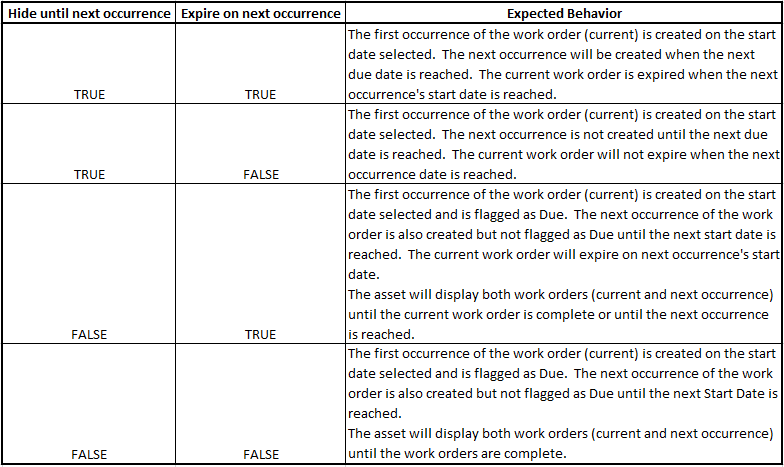
- Hide Until Next Occurrence: Hides the route from the calendar until its start date and time have been reached.
- Expire open work orders on the next occurrence: If selected the previous Work Order will be set to Expired status if it was not completed upon creation of the next Work Order, otherwise, the incomplete work will remain as due on the asset.
- Ends:
- Never: The work orders will be generated for infinity
- After a number of occurrences: The work orders will only be generated X number of times.
- On a certain date: The work orders will be generated until a specific date
Note: Work orders will not appear in My Events (calendar) until they are edited and saved.
Manage Future Re-occurrences of Routes
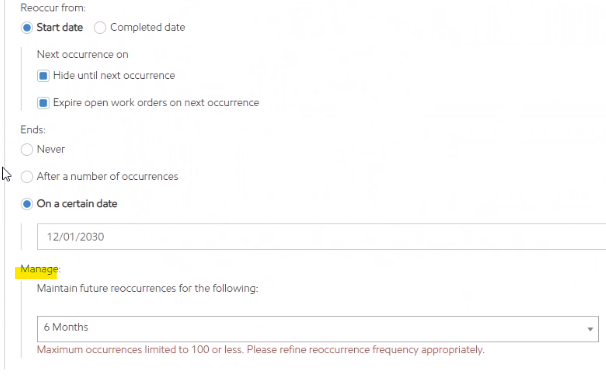
If you would like to maintain future re-occurrences for your routes you can do so with the "Manage" feature located at the bottom of the page when creating routes. You can set these to reoccur for 1 week, 2 weeks, 1 month, 2 months, 3 months, 6 months, 12 months, 2 years, or 5 years. Once finished, select Next.
Add Assets
Searching
Assets can be searched using either a quick or advanced search. The Assets selector will allow the user to select a parent, a parent, and children, one asset individually, etc. Users can ADD ALL or Remove Selected or simply remove one asset from the list on the left. When assets are added they will appear in the Assigned Assets column on the left. The search bar at the top of the assigned assets allows the user to ensure that particular assets are added.
Add Assets using a Saved Search
Assets can be added to Routes based on a Saved Shared Search:
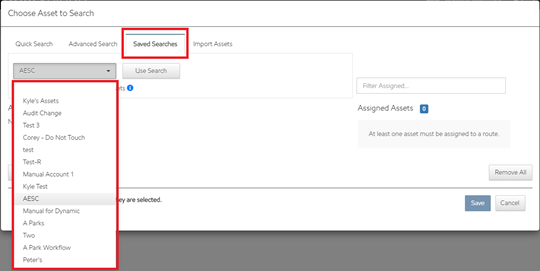
- Select the Saved Searches tab. In the dropdown, a list of all Saved Searches belonging to the user or shared with the user is shown.
- Select the Saved Search then select Use Search. All assets returned by that Saved Search will be included in the Route.
Security Rights Required: Create Routes with Saved Searches
Dynamically Update Assets on Route
Assets can be automatically included or excluded from a Route dynamically based on any Saved Search, either unshared, shared with specific individuals, or shared with everyone.
If an asset meets the search criteria (or no longer meets them) in the Saved Search, it will be included/excluded from the Route automatically.
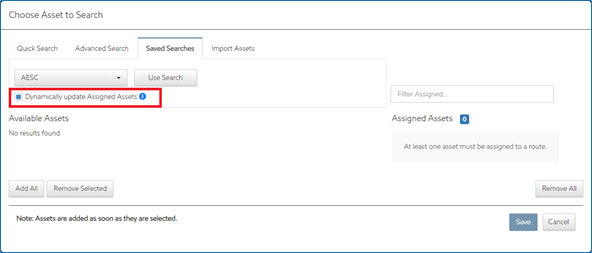
When creating a Route from a Saved Search, once the search is selected select Dynamically update Assigned Assets, then select Use Search.
Anyone with the ability to create and edit routes with Saved Searches can edit the Saved Search in use for a dynamic route. However, if the Saved Search is one the user wouldn't normally see due to it not being shared with them:
- The user can still see the saved search with a flag indicating it is one they wouldn't normally see.
- If the user removes such a saved search then, once the route is saved, they will no longer be able to add it back it is not one they would normally see.
Limitations
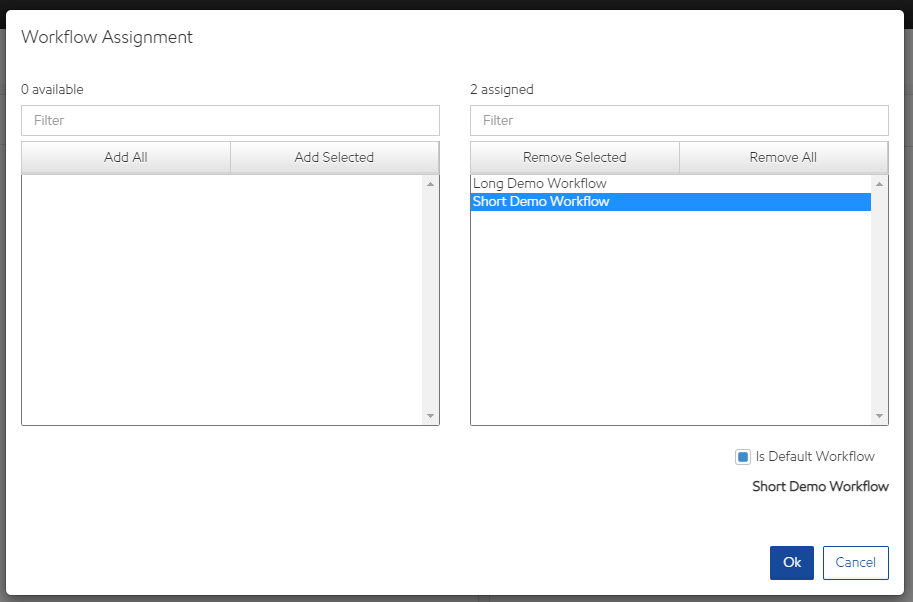
It is not possible to manually set the workflows used in a dynamic route. These workflows are set based on the default workflow assigned to an asset class.
Users can manually update the asset list of a dynamic route when editing the route by selecting Update Dynamic Assets: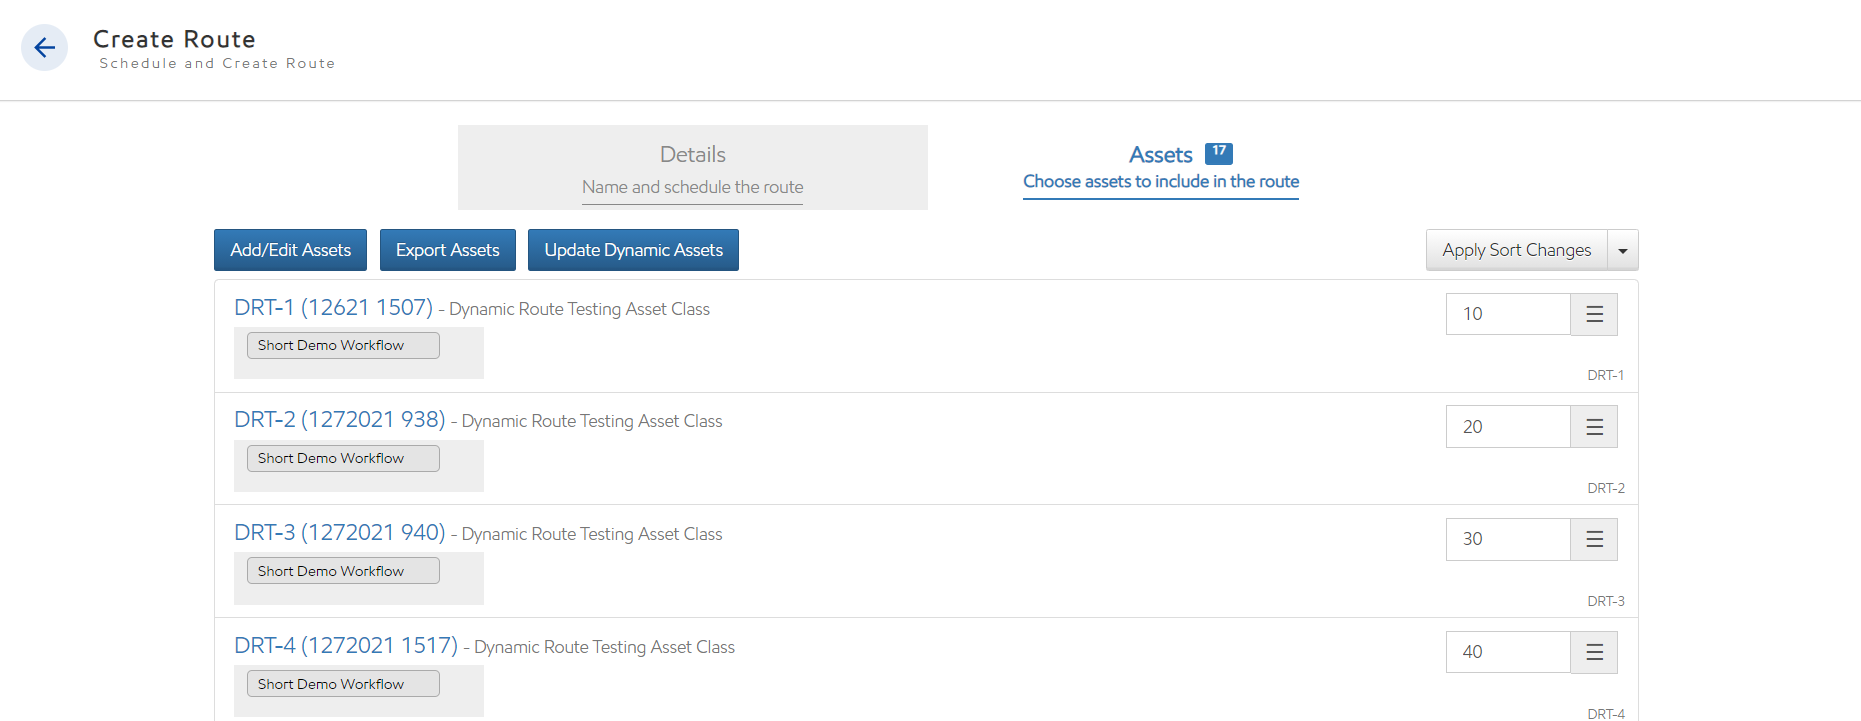
Otherwise, the asset list of a dynamic route will be updated overnight at 6:00 PM Eastern Standard Time.
Security Rights Required: Create Routes with Saved Searches
Import/Export Assets in a Route
Assets can be easily included or excluded from a route via an import.
When Assets are already included in a route, select Export Assets to get a list of the assets included in the route and the workflows assigned.

A Microsoft Excel Sheet is downloaded. Users can add assets to the route along with the workflow assigned, edit the assigned workflows, or remove assets already in the route in bulk:
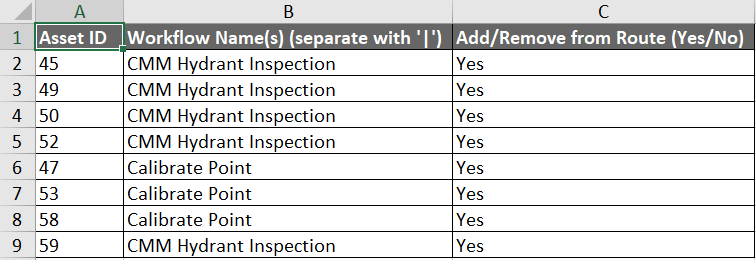
Once the appropriate changes are made to the Excel Sheet, select Add/Edit Assets.
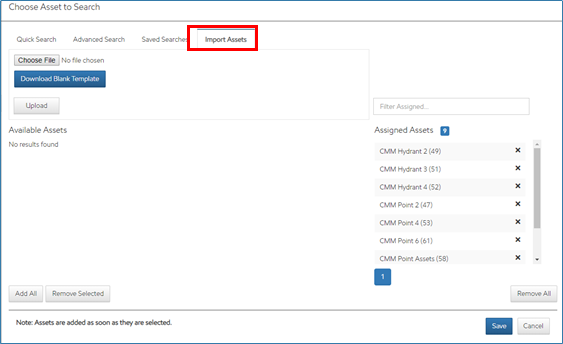
Select the Import Assets tab.
Select Choose File, select the appropriate spreadsheet, then select Upload.
Security Rights Required: Create Routes via Import
Sorting
Assets/Workflows can be sorted by dragging and dropping them into the correct sequence or adjusting the number found on the right side of the asset. This sequence is adjusted when the Apply Sort Changes button is selected. The sort order is used to determine the sequence of work orders when they are sorted by "Sequence" on the Routes Dashboard.
Workflows
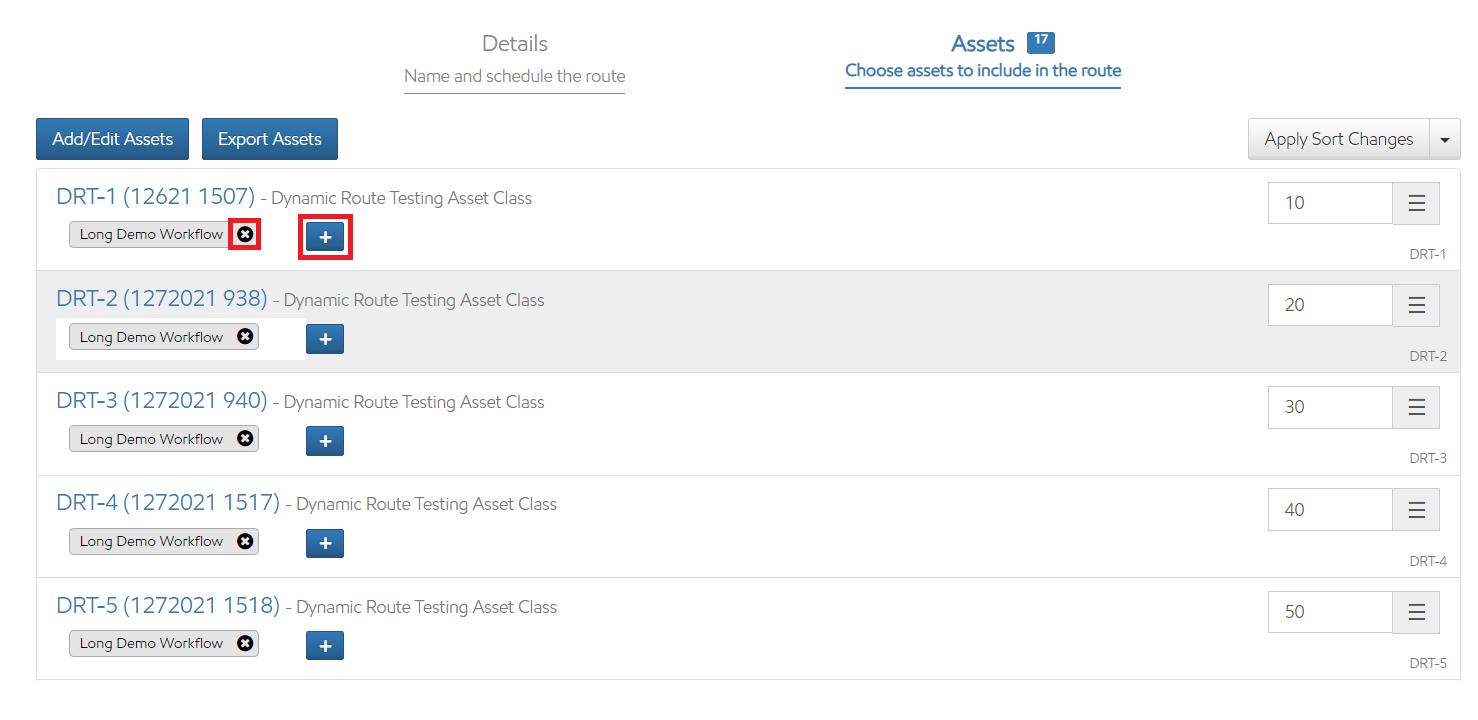
Assets are assigned the default workflow on the asset class, or the first workflow assigned to that asset class if there is no default. A new workflow can be assigned or the existing workflow removed by selecting the plus icon to add or the x on the workflow to remove:
Changing the workflows assigned to an asset prompts a user if they would like to apply the same changes to all other assets of the same asset class:
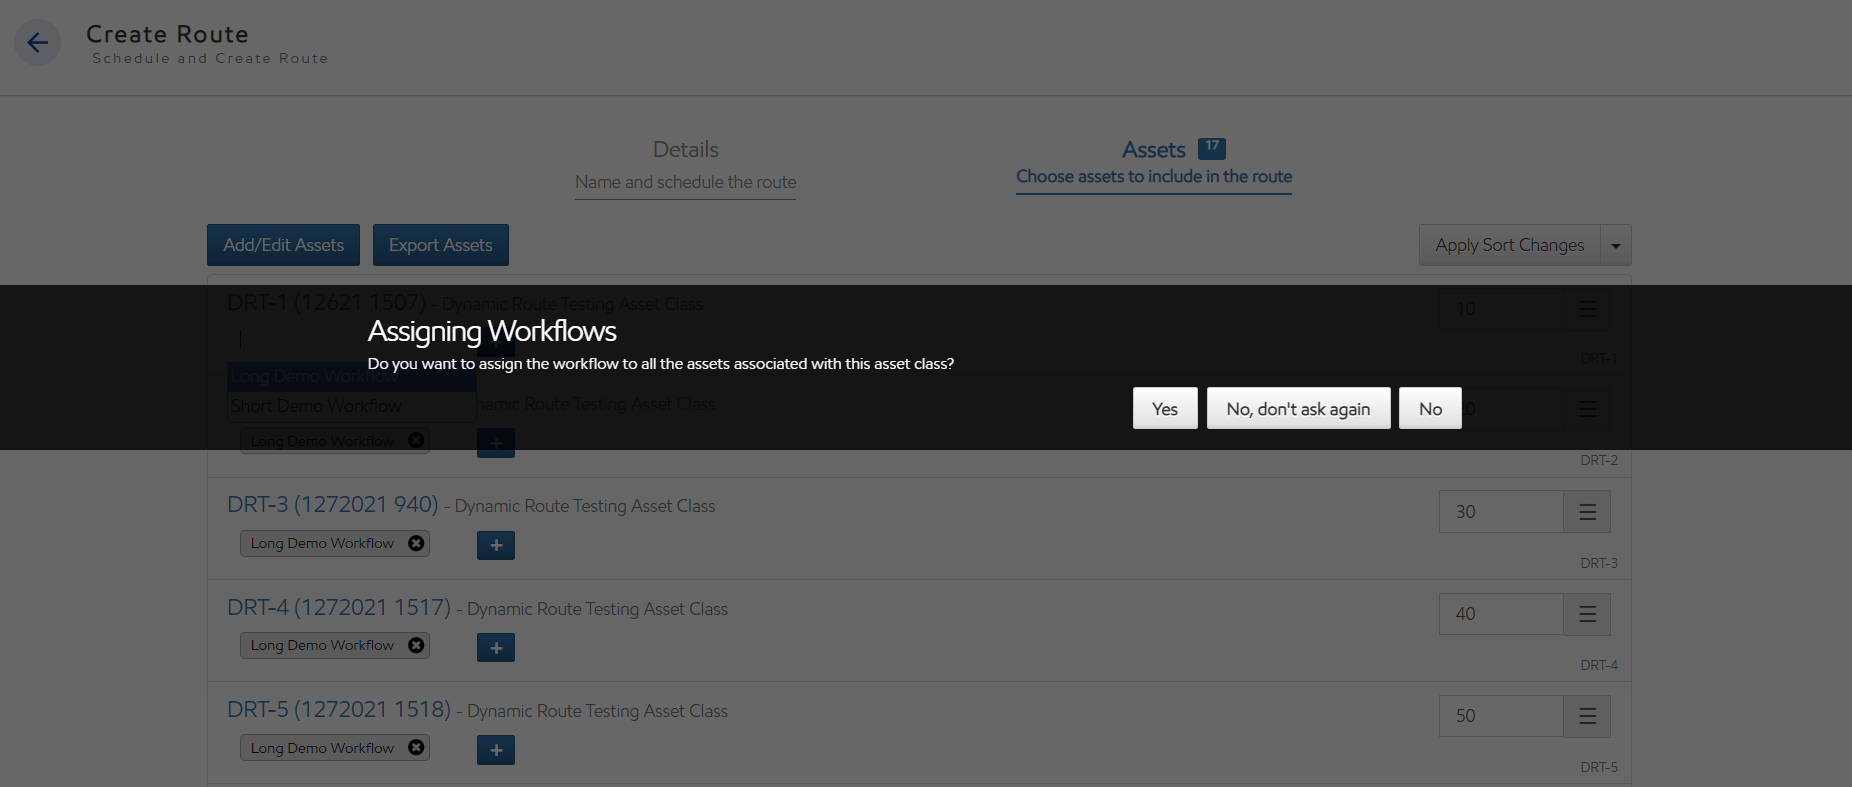
Once a user has set the scheduling and assigned workflows to all assets, they can then create the route by selecting Save.
Viewing Routes
Users can view routes using the dropdown in the route display area. The user can choose to view all routes, inactive routes, or only their active routes. The user can search for a route by typing a keyword into the search bar in the lower right corner. This search will take into account the filters applied to the window. Selecting the link icon next to a Route's name will bring up its details.
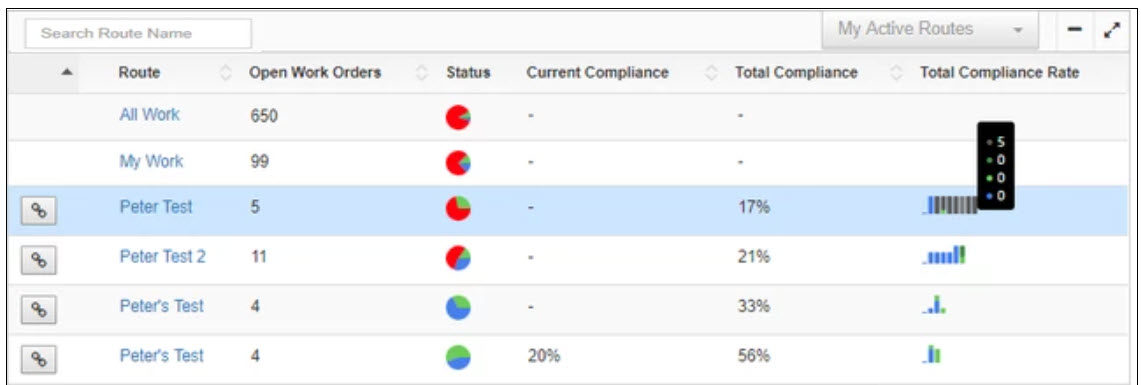
- Status: displays a pie chart indicating the percentages of "Open", "Due" and "Completed" work.
- Current Compliance: displays the percentage of work done in the current interval of the route.
- Total Compliance: displays the percentage of total work completed in the route.
- Total Compliance Rate: displays a bar for each time a route is completed for a maximum of eight routes. The Graph will show a numerical value for each category when hovered over.
Work Orders
Users can view, filter, and sort work orders in the Work Orders section on the right side of the dashboard. The filters are contained in the dropdown next to the Work Orders title.
Quick Steps to View Work Orders
- Select the Routes Dashboard Tile from the Dashboard or the left navigation menu.
- Search the Route’s name in the search bar.
- Select the link icon to the left of the Route’s name.
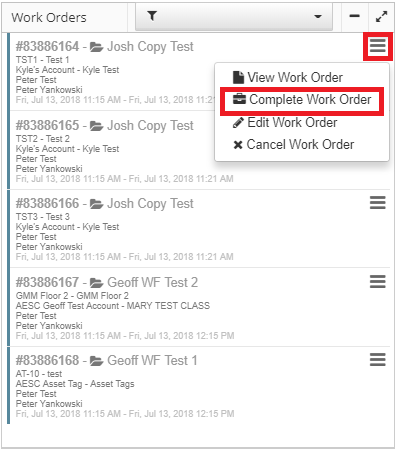
- In the Work Orders section, select the Triple Bar of the desired asset.
- Select View Work Order.
Details to View Work Orders
Viewing a Work Order redirects the user to a details page about the Work Order and the Asset. From this page, the user can Edit the Work Order, Complete the Work Order and Cancel the Work Order. This page also includes a timeline of past changes made to the work order.
From this page, the user can navigate to the Route that the work order is associated with.
Searching Work Orders
Users can search for a specific work order by typing its name into the search bar. The search will display Work Orders based on the filters selected.
Filters
Users can filter and sort the Work Orders by using the dropdown at the top of the Work Orders Area. Having no filters selected will cause the Work Orders Area to display no Work Orders.
- Schedule Date: Sorts the Work Orders by their due date with the oldest due work orders at the top.
- Sequence: Sorts the Work Orders by the sequence assigned to them when the Route was created.
- Open: Displays all Work Orders with the "Open" Status. Open Work Orders are displayed in red.
- Completed: Displays all Work Orders with the "Completed" status. Completed Work orders are displayed in light green and have their names crossed out.
- Closed: Displays all Work Orders with the "Closed" status. Closed Work Orders are displayed in dark green and have their names crossed out.
- Canceled: Displays all Work Orders with the "Canceled" status. Canceled Work Orders are displayed in grey and have their names crossed out.
- Expired: Displays Work Orders that were not completed or canceled in the interval set and will have an X next to the name
- Current Interval Only: Displays all Work Orders from the filters above that are in the current interval period.
Work Order Details
The Work Order Details Page is where users can edit, complete, cancel and view details of the work order and its associated asset.
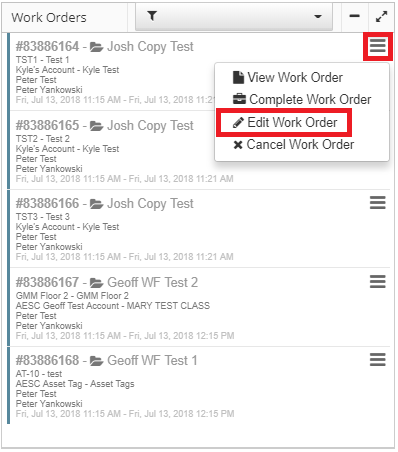
- Edit: Users can edit work orders by selecting the Edit Work Order button. This will allow the user to edit the Work Order's Description, Priority, Type, Assignees, Tags, and start date.
- Complete: Users can complete work orders by selecting the Complete Work Order button. Users will be redirected to the Workflow Report Editor page.
- Cancel: Users can cancel work orders by selecting the Cancel Work Order button.
- Reopen Work Order: Users can reopen closed or canceled work orders by selecting the Reopen Work Order button.
- Close: Users can close Completed Work Orders by selecting the Close button
- Work Order Timeline: Users can view a timeline of changes made to a work order on the right side of the screen. Users can add notes and attachments to this area as well.
- Asset Details: Users can view details of the asset in the lower-left section of the screen. This area contains a short history of past work orders as well.
Completing Work Orders
Quick Steps to Complete Work Orders
- Select the Routes Dashboard Tile from the Dashboard or from the left navigation menu.
- Search the Route’s name in the search bar.
- Select the Link to the left of the Route’s name.
- In the Work Orders section, select the Triple Bar of the desired asset.
- Select Complete Work Order.
- Complete the Work Order.
- Select Save.
My Events - Calendar
Users can view assigned work orders in the My Events section of the Routes Dashboard. This section includes a monthly, agenda and daily display of work orders. The work orders displayed are based on what work orders are filtered in the Work Orders section and the Route selected.
Colors
Colors are used to indicate the status of a Work Order. The Work Order's color will appear in the Work Order section and in the My Events section.
| Status | Color | Description |
|---|---|---|
| Open | Blue | Start date has not yet passed |
| Due | Red | Start date has been passed. |
| Completed | Light Green | Completed Work Orders. |
| Closed | Dark Green | Work Orders that have been completed and then closed. |
| Canceled | Black | Canceled Work Orders |
| Expired | Grey | Work Orders that were not completed or canceled in the interval set |
| Purple | When a route is created, its creation date and time are displayed on the calendar as purple with a number next to it. The number represents the number of work orders represented by the purple tile. Editing work orders to a different date and or time will cause that work order to move out of the purple and the number to decrease by one. |
Statuses
- Open: work orders that have been scheduled in a route have not yet passed their start date and time. These work orders can be viewed, completed, edited, and canceled.
- Due: work orders that have already passed their start date and time. These work orders can be viewed, completed, edited, and canceled.
- Completed: work orders that have had their work completed. These work orders can be viewed and closed.
- Closed: complete work orders that have been closed. These work orders can be reopened.
- Canceled: work orders that have been canceled. These work orders can only be reopened by viewing them.
- Requested: work orders that will show as requested until they are approved and assigned. (Need specific permissions for this status)
Reopening a Work Order moves it to its previous status before it was canceled.
Timeline
Users can view a history of changes to a route as well as create notes, attachments, and websites at the bottom of the page.
Edit a Route
Quick Steps to Edit a Route
- Select the Route Dashboard Tile from the Dashboard or from the left navigation menu.
- Search the Route’s name in the search bar or via the filters in the dropdown
- Select the Link to the left of the Route’s name
- Select Edit
- Make changes to the Route Schedule
- Select Next
- Add/Edit Assets or change the sequence order
- Select Save
Edit a Work Order
Quick Steps to Edit Work Orders
- Select the Routes Dashboard Tile from the Dashboard or from the left navigation menu.
- Search the Route’s name in the search bar.
- Select the Link to the left of the Route’s name.
- In the Work Orders section, select the Triple Bar of the desired asset.
- Select Edit Work Order.
- Add a description >> Edit the Priority and Type.
- Change the Work Order’s Start Date and Start Time.
- For a reoccurring Work Order to be successfully edited, the desired date and time must fall within the current route period. For example, if a route has an interval of a day, it can only be scheduled between its current start date and the next occurrence. Scheduled Work Orders are free to be scheduled at any time in the future or on the current date.
- Select Save.
Details to Edit Work Orders
Editing a Work Order is the only way to make it appear in the My Events section of the Routes Dashboard and Routes Details pages separate from the rest of the route. For an edit to be valid, it must fall within the current route period. Furthermore, Work Orders can not be scheduled in the past. These rules only apply to Work Orders that are on a reoccurring schedule. Scheduled Work Orders can be edited to any date that is not in the past.
Cancel a Work Order
Quick Steps to Cancel Work Orders
- Select the Routes Dashboard Tile from the Dashboard or from the left navigation menu.
- Search the Route’s name in the search bar.
- Select the link icon to the left of the Route’s name.
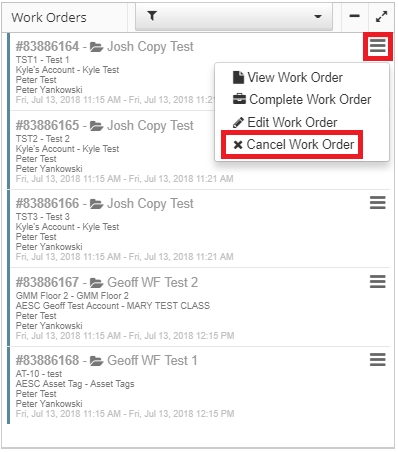
- In the Work Orders section, select the Triple Bar of the desired asset.
- Select Cancel Work Order.
- Select Yes.
Details to Cancel Work Orders
Canceling a Work Order will change the Work Order's Status to cancel. This causes the Work Order to turn Black. Canceled Work Orders can still be viewed and reopened on the Work Orders Details Page.
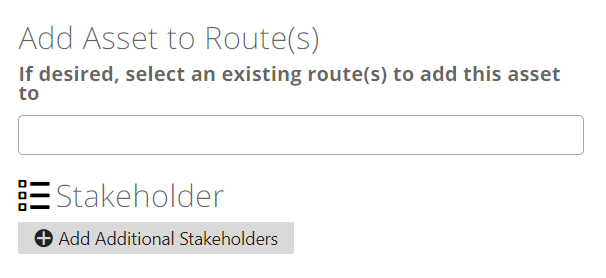
Adding Assets to a Route when Creating an
When creating a new asset at the end of the attributes it will give you the option to add the asset to an existing route or routes.
Adding Assets to a Route from the Asset tile
You can create a route from your searched assets inside the asset tile, by selecting the dropdown and choosing to create a route, this will bring you to the edit/create routes page with the assets already selected.

From here you would schedule the route to your specification and then just edit the assets workflows and order.


